@(工作笔记)
vue-record
[TOC]
console.log('hello vue')
vue2.0 $router和$route的区别
在vue2.0里页面参数是 this.$route.query或者 this.$route.params 接收router-link传的参数。

在路由跳转的时候除了用router-link标签以外需要在script标签在事件里面跳转,所以有个方法就是在script标签里面写this.$router.push('要跳转的路径名'),

 在写的时候发现这两个为什么不同,在控制台打出this的时候,发现$route和$router同时存在


$route为当前router跳转对象里面可以获取name、path、query、params等

$router为VueRouter实例,想要导航到不同URL,则使用$router.push方法

返回上一个history也是使用$router.go方法
koa2 入坑
https://blog.csdn.net/hahei2020/article/details/74357259
js & android & iOS 多种交互方式
android协议交互与模型注入 https://blog.csdn.net/carson_ho/article/details/64904691/ oc 协议交互方式 https://www.cnblogs.com/peteremperor/p/6012969.html
vue项目使用WebViewJavascriptBridge
http://mengyujing.com/vue%E9%A1%B9%E7%9B%AE%E4%BD%BF%E7%94%A8WebViewJavascriptBridge/
按需加载
https://segmentfault.com/a/1190000011426274
export 两种情况
https://segmentfault.com/q/1010000008760434/a-1020000008760580
css解决fixed布局不会出现滚动条的问题
https://blog.csdn.net/u014520745/article/details/52881300
如果我们布局的是后是fixed并且想要高度为100%的时候,我们一般会这样设置:
div {
    display:fixed;
    height:100%;
    overflow:scroll;
}
但是这样并不会出现滚动条,正确的做法应该设置top和bottom为0:
.fixed-content {
    top: 0;
    bottom:0;
    position:fixed;
    overflow-y:scroll;
    overflow-x:hidden;
}
css calc 妙用 - -
https://blog.csdn.net/qq_17518593/article/details/52689178
例如 :设置div元素的高度为当前窗口高度-100px
     div{
       height: calc(100vh - 100px);
    }
可以这么写...
仿饿了么H5
https://www.jianshu.com/p/65c957b228e9
vm.$nextTick( [callback] )
new Vue({
  // ...
  methods: {
    // ...
    example: function () {
      // 修改数据
      this.message = 'changed'
      // DOM 还没有更新
      this.$nextTick(function () {
        // DOM 现在更新了
        // `this` 绑定到当前实例
        this.doSomethingElse()
      })
    }
  }
})
backdrop-filter 和filter 写出高斯模糊效果 以及两者区别
https://www.cnblogs.com/wyan20/p/6558034.html
vue原码解读
Vue.nextTick 的原理和用途
https://segmentfault.com/a/1190000012861862
生命周期
https://segmentfault.com/a/1190000008010666
console命令详解
https://www.cnblogs.com/pengfei25/p/6019525.html
vue cli 3.0
vue create vue_cli_test

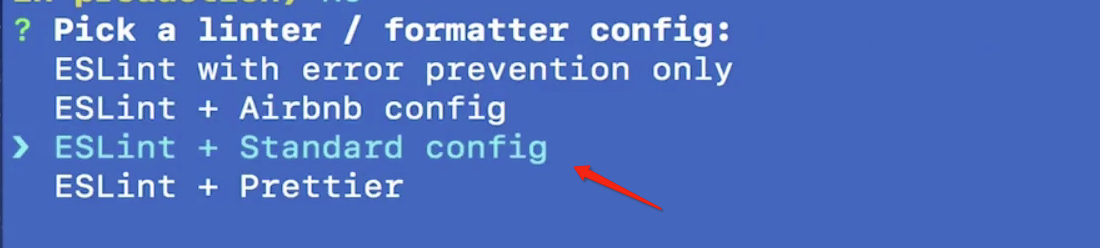


my eslint
  rules        : {
    // allow async-await
    'generator-star-spacing'            : 'off',
    // allow debugger during development
    'no-debugger'                       : process.env.NODE_ENV === 'production' ? 'error' : 'off',
    // edit by stone
    'no-multi-spaces'                   : 'off',
    'key-spacing'                       : 'off',
    'semi'                              : 'off',
    'comma-dangle'                      : 'off',
    'object-curly-spacing'              : 'off',
    'indent'                            : 'off',
    'no-unused-vars'                    : 'off',
    'block-spacing'                     : 'off',
    'no-multiple-empty-lines'           : 'off',
    'no-trailing-spaces'                : 'off',
    'standard/object-curly-even-spacing': 'off',
    'spaced-comment'                    : 'off',
    'camelcase'                         : 'off',
    'func-call-spacing'                 : 'off',
    'padded-blocks'                     : 'off',
    'import/first'                      : 'off',
    'space-before-function-paren'       : 'off',
    'handle-callback-err'               : 'off',
    'object-property-newline'           : 'off',
    'comma-spacing'                     : 'off',
    'quotes'                            : 'off',
    'no-unneeded-ternary'               : 'off',
    'vue/no-unused-components'          : 'off',
    'no-return-await'                   : 'off',
  },
预处理器
你可以在创建项目的时候选择预处理器 (Sass/Less/Stylus)。如果当时没有选好,内置的 webpack 仍然会被预配置为可以完成所有的处理。你也可以手动安装相应的 webpack loader:
# Sass
npm install -D sass-loader node-sass

# Less
npm install -D less-loader less

# Stylus
npm install -D stylus-loader stylus
然后你就可以导入相应的文件类型,或在 *.vue 文件中这样来使用:
<style lang="scss">
$color: red;
</style>
<style scoped lang="scss" rel="stylesheet/scss">
  .Users {
    /* important code */
    height: 100%

  }
</style>

<style scoped lang="stylus" rel="stylesheet/stylus">
  .Users {
    /* important code */
    height: 100%
  }
</style>

<style scoped lang="less" rel="stylesheet/less">
  .Users {
    /* important code */
    height: 100%

  }
</style>
vue add axios
vue 3.0 插件添加方式
vue.config.js
const eleme = require('./data/eleme.json')

module.exports = {
  // "baseUrl" option in vue.config.js is deprecated now, please use "publicPath" instead.
  // baseUrl  : '/', // 根路径
  publicPath: '', // 相对路径
  outputDir : 'dist', // 构建输出目录
  assetsDir : 'assets', // 静态资源目录(js,css,img,fonts)
  lintOnSave: false, // 是否开启eslint 保存检测, 有效值: true || false || 'error'

  devServer: {
    // open   : false, // 当启动项目的时候 是否自动打开浏览器
    // host   : '0.0.0.0',
    // port   : 9000,
    // https  : false, // 会有警告..
    // hotOnly: false, // webpack 查看具体信息 [hotOnly](https://webpack.js.org/configuration/dev-server/#devserverhotonly)
    proxy: {
      // proxy all requests starting with /api to jsonplaceholder
      '/data': {
        target      : 'http://localhost:8080',   //代理接口
        changeOrigin: true,
        pathRewrite : {
          '^/data': '',    //代理的路径
        },
      },
    },
    // 本地数据, 模拟请求
    before (app, server) {
      // http://localhost:8081/data/eleme
      app.get('/data/eleme', function (req, res) {
        res.json(eleme)
      })
    },
  },
}
路由
/* eslint-disable object-property-newline,comma-spacing */
import Vue           from 'vue'
import Router        from 'vue-router'
import Home          from './components/Home'
import Menu          from './components/Menu'
import Login         from './components/Login'
import Register      from './components/Register'
import Admin         from './components/Admin'
import About         from './components/about/About'
// 二级路由
import Contact       from './components/about/Contact'
import Delivery      from './components/about/Delivery'
import History       from './components/about/History'
import OrderingGuide from './components/about/OrderingGuide'
// 三级路由
import Phone         from './components/about/contact/Phone'
import PersonName    from './components/about/contact/PersonName'

Vue.use(Router)

// 路由独享的守卫
function adminBeforeEnter (to, from, next) {
  next()
  // alert('请登录管理员...')
  // next(false)

  // if (to.path === '/login' || to.path === '/register') {
  //   next()
  // } else {
  //   alert('请登录管理员...')
  //   // next('/login')
  //   next({ name: 'login' })
  // }
}

let router = new Router({
  routes: [
    {
      path: '/', name: 'home', components: {
        default      : Home,
        orderingGuide: OrderingGuide,
        delivery     : Delivery,
        history      : History,
      },
    },
    { path: '/menu', name: 'menu', component: Menu },
    { path: '/login', name: 'login', component: Login },
    { path: '/register', name: 'register', component: Register },
    // { path: '/admin', name: 'admin', component: Admin, beforeEnter: adminBeforeEnter },
    { path: '/admin', name: 'admin', component: Admin },
    {
      path: '/about', name: 'about', redirect: { name: 'contact' }, component: About, children: [
        {
          path: '/about/contact', name: 'contact', redirect: { name: 'phone' }, component: Contact, children: [
            { path: '/phone', name: 'phone', component: Phone },
            { path: '/personname', name: 'personName', component: PersonName },
          ],
        },
        { path: '/delivery', name: 'delivery', component: Delivery },
        { path: '/history', name: 'history', component: History },
        { path: '/orderingGuide', name: 'orderingGuide', component: OrderingGuide },

      ],
    },

    { path: '*', redirect: '/' },

    // { path: '/about', name: 'about', component: () => import(/* webpackChunkName: "about" */ './views/About.vue') },
    // { path: '/about', name: 'about', component: () => import(/* webpackChunkName: "about" */ './views/About.vue') },
    // { path: '/about', name: 'about', component: () => import(/* webpackChunkName: "about" */ './views/About.vue') },
    // { path: '/about', name: 'about', component: () => import(/* webpackChunkName: "about" */ './views/About.vue') },
    // {
    //   path     : '/about',
    //   name     : 'about',
    //   // route level code-splitting
    //   // this generates a separate chunk (about.[hash].js) for this route
    //   // which is lazy-loaded when the route is visited.
    //   component: () => import(/* webpackChunkName: "about" */ './views/About.vue'),
    // },
  ],
  mode  : 'history',

  scrollBehavior (to, from, savedPosition) {

    // return { x: 0, y: 100 }
    // return { selector:'.btn' }

    if (savedPosition) {
      return savedPosition
    } else {
      return { x: 0, y: 0 }
    }
  },
})

// 全局守卫
// router.beforeEach(function (to, from, next) {
//   // alert('还没有登录, 请先登录')
//   // console.log(JSON.stringify(to, null, 2));
//   // console.log(JSON.stringify(from, null, 2));
//   // console.log(next);
//
//   if (to.path === '/login' || to.path === '/register') {
//     next()
//   } else {
//     alert('还没有登录, 请先登录')
//     // next('/login')
//     next({ name: 'login' })
//   }
// })

// 后置钩子
// router.afterEach(function (to,from) {
//     alert('after each')
// })

export default router
后退不刷新数据
<template>
  <div class="Home">
    <div class="flex-column" :style="{width: '100%', height: '100%'}">
      <Menu mode='horizontal' :style="{fontSize: 13.5, backgroundColor: '#000'}">
        <Menu.Item :style="{ marginLeft : 24, marginRight: 30, fontSize: 18, textAlign: 'center', color: '#fff2e8 !important', float: 'left' }">
          <a href='/' class='hover-scale logo-text' :style="{color: '#fff2e8'}">StonePark预告片网站</a>
        </Menu.Item>
        <Menu.Item v-for="(e) in navRoutes" :key="e.name">
          <a :href="e.path" :style="{color: '#fff2e8'}">{{e.name}}</a>
        </Menu.Item>
      </Menu>
      <!--<Spin :spinning="spinning" :tip="tip" wrapperClassName="content-spin full">-->
      <Spin :spinning="spinning" :tip="tip" wrapperClassName="full">
        <div class='flex-row full'>
          <div class='flex-1 scroll-y align-self-start'>
            <Content :movies="movies"></Content>
          </div>
        </div>
      </Spin>
    </div>
  </div>
</template>

<script type="text/ecmascript-6">
  import request                from '../../lib/request';
  import { Menu, Spin, Switch } from 'ant-design-vue';
  import navRoutes              from '../../nav';
  import axios                  from 'axios';
  import Content                from '../../components/Content';

  export default {
    // props     : ['users'],
    // props     : {
    //   users: {
    //     type    : Array,
    //     required: true,
    //   },
    // },
    components: {
      Menu,
      'Menu.Item'     : Menu.Item,
      'Menu.ItemGroup': Menu.ItemGroup,
      'Menu.SubMenu'  : Menu.SubMenu,
      Spin,
      'a-switch'      : Switch,
      Content,
    },
    name      : 'Home',
    data () {
      return {
        current  : ['mail'],
        navRoutes: navRoutes,
        tip      : 'wait for seconds',
        movies   : [],
        spinning : true,
      };
    },
    /** methods */
    methods   : {

      changeSpinning () {
        this.spinning = !this.spinning;
      },
      getMovies () {
        axios({
          timeout: 5000, method: 'get',
          // url    : `/data/api/v0/movies`,
          url    : `http://localhost:8080/api/v0/movies`,
        }).then(res => {
          const { success, data, err, code } = res.data;
          if (code === 401) {
            window.location.href = '/';
          } else if (success) {
            this.changeSpinning();
            this.movies = data;
          } else {
            throw err;
          }
        }).catch(err => {
          throw err;
        });
      },
    },
    /** computed */
    computed  : {},

    mounted () {
      this.getMovies();
    },

    beforeDestroy () {
      // window.__LOADING__ = null
    },
    beforeRouteEnter (to, from, next) {
      for (let key in from) {
        console.log(key, from[key]);
      }
      console.log('■■■■■■■■■■■■■■■■■■■■■■■■■■■■■■■■■■■■■■■■■■■■■■■■■');
      if (from.name === 'detail') {
        to.meta.needToRefresh = false;
      }
      next();
      // next(function (vm) {
      //   alert('hello ' + vm.name)
      // })
    },
    beforeRouteLeave (to, from, next) {
      next();
      // if (confirm('确定离开吗?') === true) {
      //   next()
      // } else {
      //   next(false)
      // }
    },
    activated () {
      //开启了keepAlive:true后再次进入,以前的搜索条件和页数都不会变,无论什么情况都调用一下获取数据的接口,这样就能得到当前搜索条件和页数的最新数据
      if (this.$route.meta.needToRefresh) {
        //重置ifDoFresh
        this.$route.meta.needToRefresh = false;
        this.getMovies();
      } else {

      }
    },
  };
</script>

<!--cnpm i -D less less-loader stylus stylus-loader node-sass sass-loader-->
<!--<style scoped lang="less" rel="stylesheet/less">-->
<!--<style scoped lang="stylus" rel="stylesheet/stylus">-->
<style lang="scss" rel="stylesheet/scss">

  .Home {
    /*a {*/
    /*color : #fff !important;*/
    /*}*/
  }

</style>


# router.js

import Vue    from 'vue';
import Router from 'vue-router';

Vue.use(Router);

let router = new Router({
  // mode: 'history',
  // base: process.env.BASE_URL,
  routes: [
    {
      path: '/', name: 'home', component: () => import(/* webpackChunkName: "about" */ './views/home/Home.vue'),
      meta: {
        keepAlive    : true,
        needToRefresh: false,
      },
    },
    {
      path: '/detail/:id', name: 'detail', component: () => import(/* webpackChunkName: "detail" */ './views/movie/Detail.vue'),
    },
    {
      path: '/admin', name: 'admin', component: () => import(/* webpackChunkName: "admin" */ './views/admin/Admin.vue'),
    },
    {
      path: '/admin/list', name: 'list', component: () => import(/* webpackChunkName: "list" */ './views/admin/List.vue'),
    },
    {
      path: '/about', name: 'about', component: () => import(/* webpackChunkName: "about" */ './views/About.vue'),
    },
    { path: '*', redirect: '/' },
  ],
});

export default router;
.vue 文件支持 jsx语法
Please vote for https://youtrack.jetbrains.com/issue/WEB-26839;

note that you can specify script type explicitly in .vue file (<script type="text/jsx">)  to get JSX recognized
Vue项目调试总结-WebStorm+Chrome调试
http://ju.outofmemory.cn/entry/354985
URL中的hash(井号)
https://www.cnblogs.com/joyho/articles/4430148.html
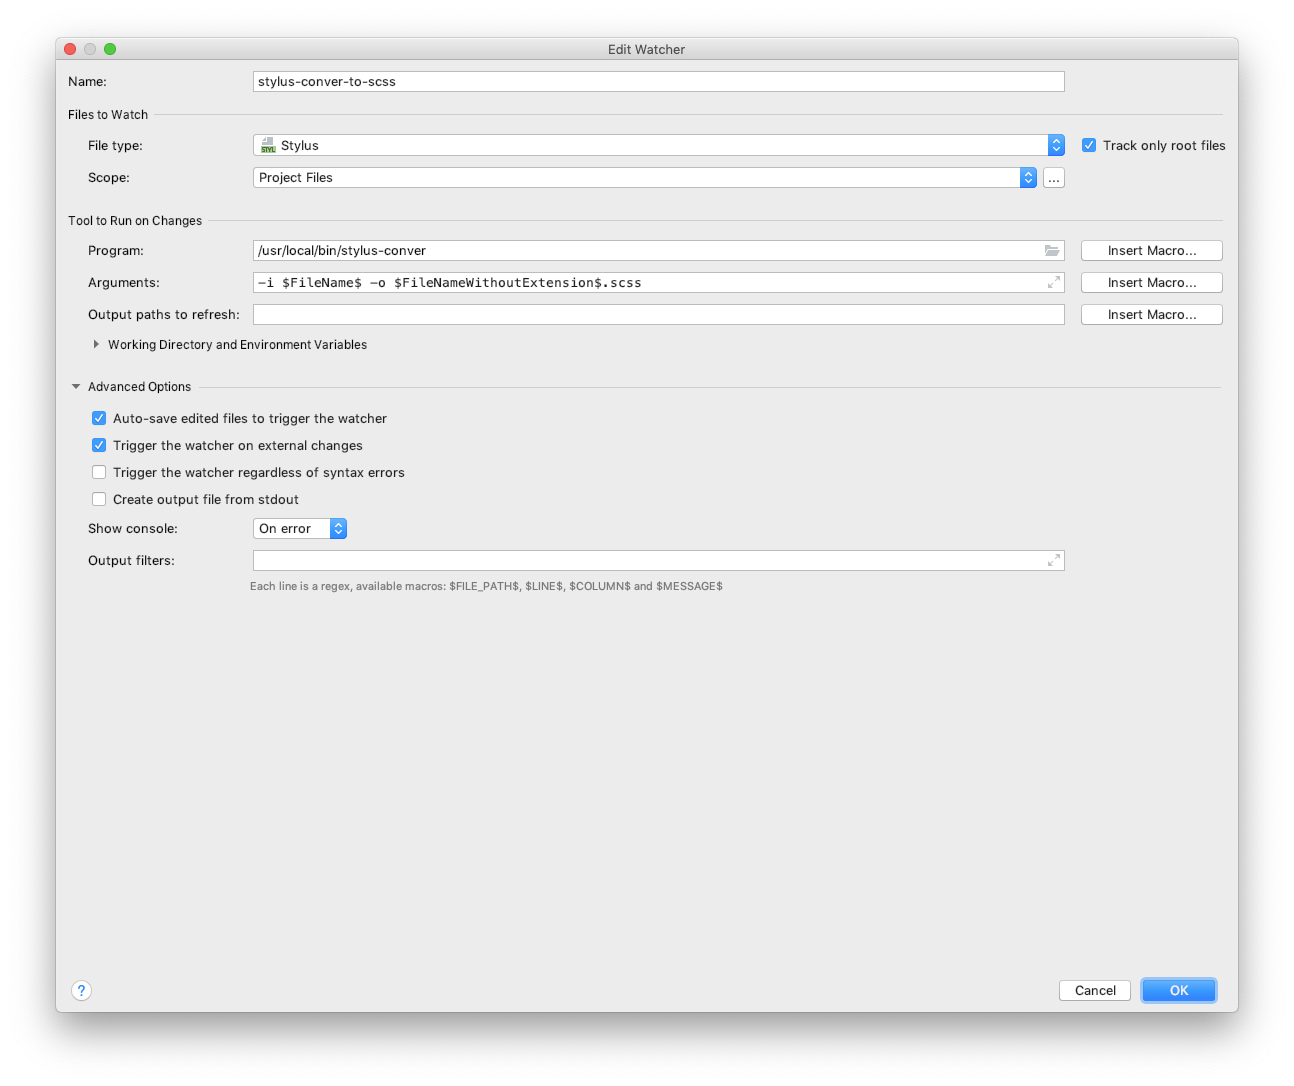
styleus 转 SCSS
解决 vue 项目一直出现 sockjs-node/info?t=1554978** ,并造成浏览器不能及时更新编码改动结果
https://blog.csdn.net/gulang03/article/details/89217273
翻墙全局模式 不能实时刷新 蛋疼...
vue-cli3安装 和vue-cli2继续使用
https://www.jianshu.com/p/efb2b117dc5c
官方链接:https://cli.vuejs.org/zh/guide/installation.html

1.安装Vue cli3

关于旧版本

Vue CLI 的包名称由 vue-cli 改成了 @vue/cli。 如果你已经全局安装了旧版本的 vue-cli(1.x 或 2.x),你需要先通过 npm uninstall vue-cli -g 或 yarn global remove vue-cli 卸载它。


Node 版本要求

Vue CLI 需要 Node.js 8.9 或更高版本 (推荐 8.11.0+)。你可以使用 nvm 或 nvm-windows在同一台电脑中管理多个 Node 版本。


可以使用下列任一命令安装这个新的包:

npm install -g @vue/cli

# OR

yarn global add @vue/cli

安装之后,你就可以在命令行中访问 vue 命令。你可以通过简单运行 vue,看看是否展示出了一份所有可用命令的帮助信息,来验证它是否安装成功。

你还可以用这个命令来检查其版本是否正确 (3.x):

vue --version

2.安装完Vue cli3 之后,还想用vue-cli2.x 版本

Vue CLI 3 和旧版使用了相同的 vue 命令,所以 Vue CLI 2 (vue-cli) 被覆盖了。如果你仍然需要使用旧版本的 vue init 功能,你可以全局安装一个桥接工具:

npm install -g @vue/cli-init

//安装完后 就还可以使用 vue init 命令

vue init webpack my_project

安装vue-cli3.0时:

npm 警告:过时的 core-js @ 1.2.7;2.6.8版本以前的core-js都不再保留,请升级到core-js@3版本或者至少@2版本报错

解决方法:

npm install --save core-js@^3
VUE 项目引入Sass后启动报错 TypeError [ERR_INVALID_ARG_TYPE]: The "path" argument must be of type string 解决方法
https://www.cnblogs.com/monkeyblog/p/13728272.html
把package.json里面\node-sass和**sass-loader**\版本改成:"node-sass": "^4.11.1","sass-loader": "^7.3.0"就可以了**
动画效果不起作用的原因
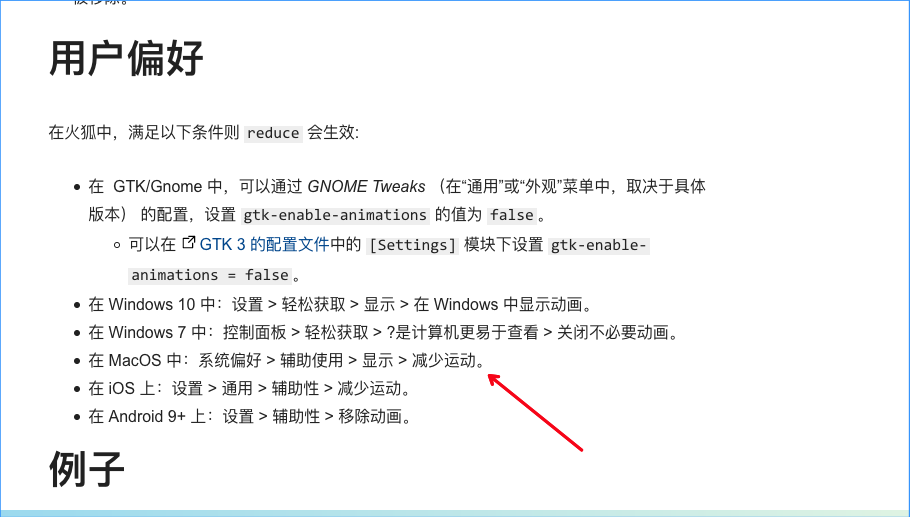
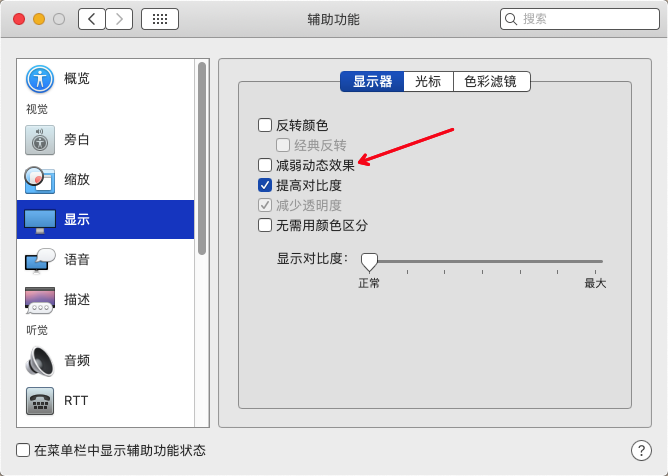
如果选中了 减弱动态效果 就悲剧了... 不过选了 能提高系统性能...蛋疼啊
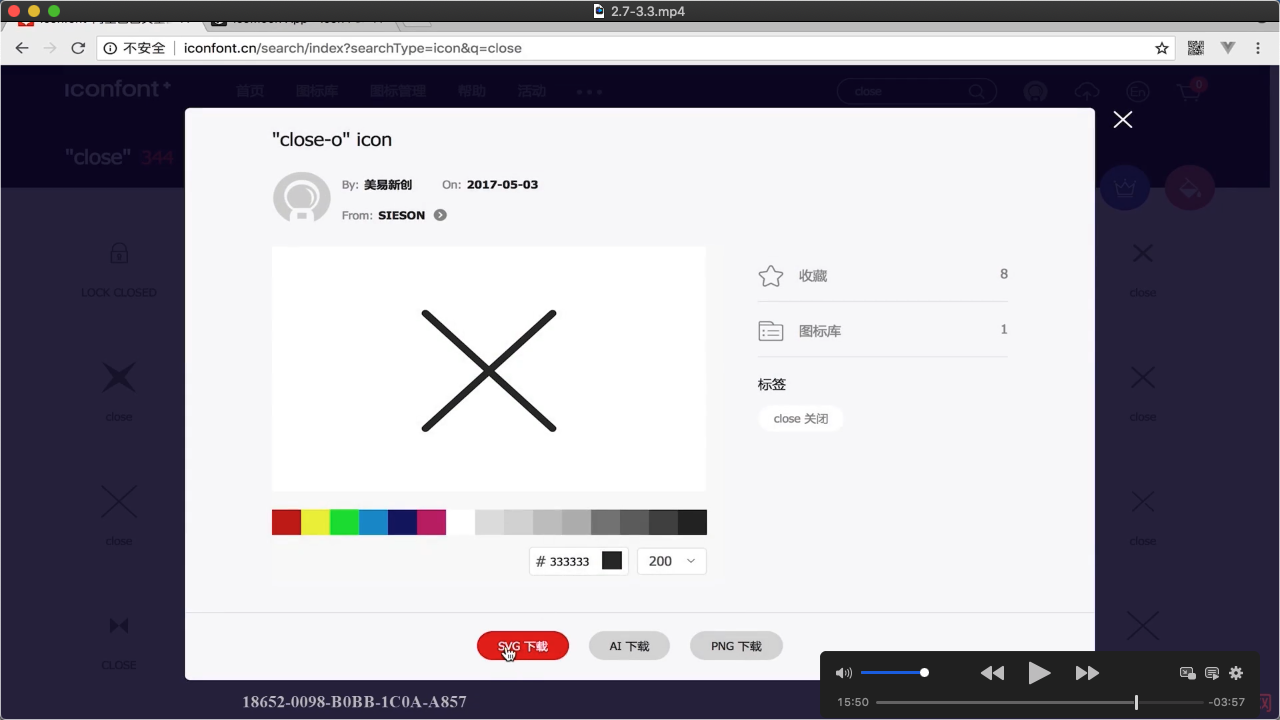
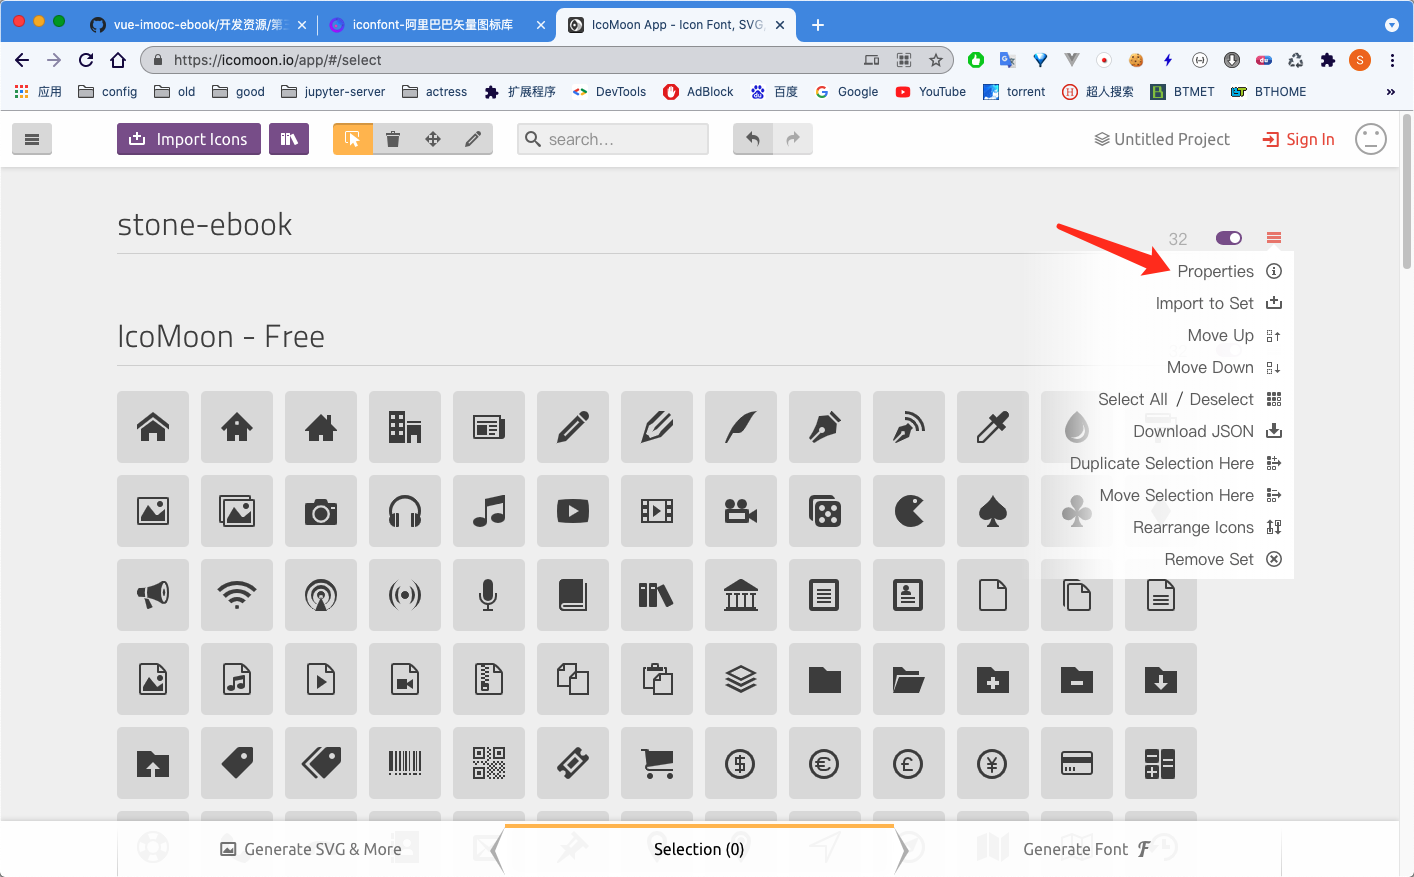
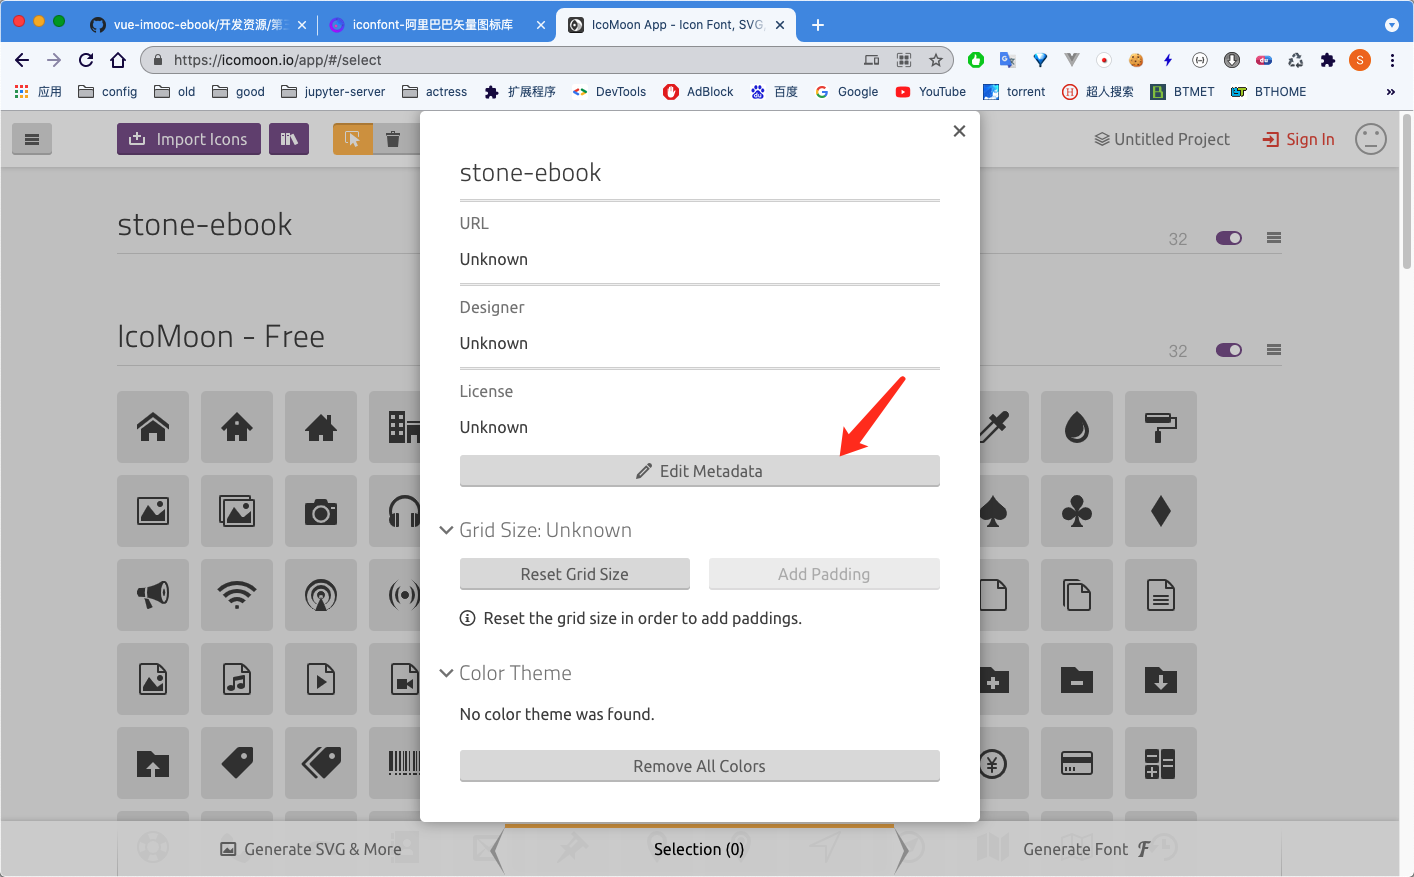
icon font 使用
- 去https://www.iconfont.cn/ 下载svg图标
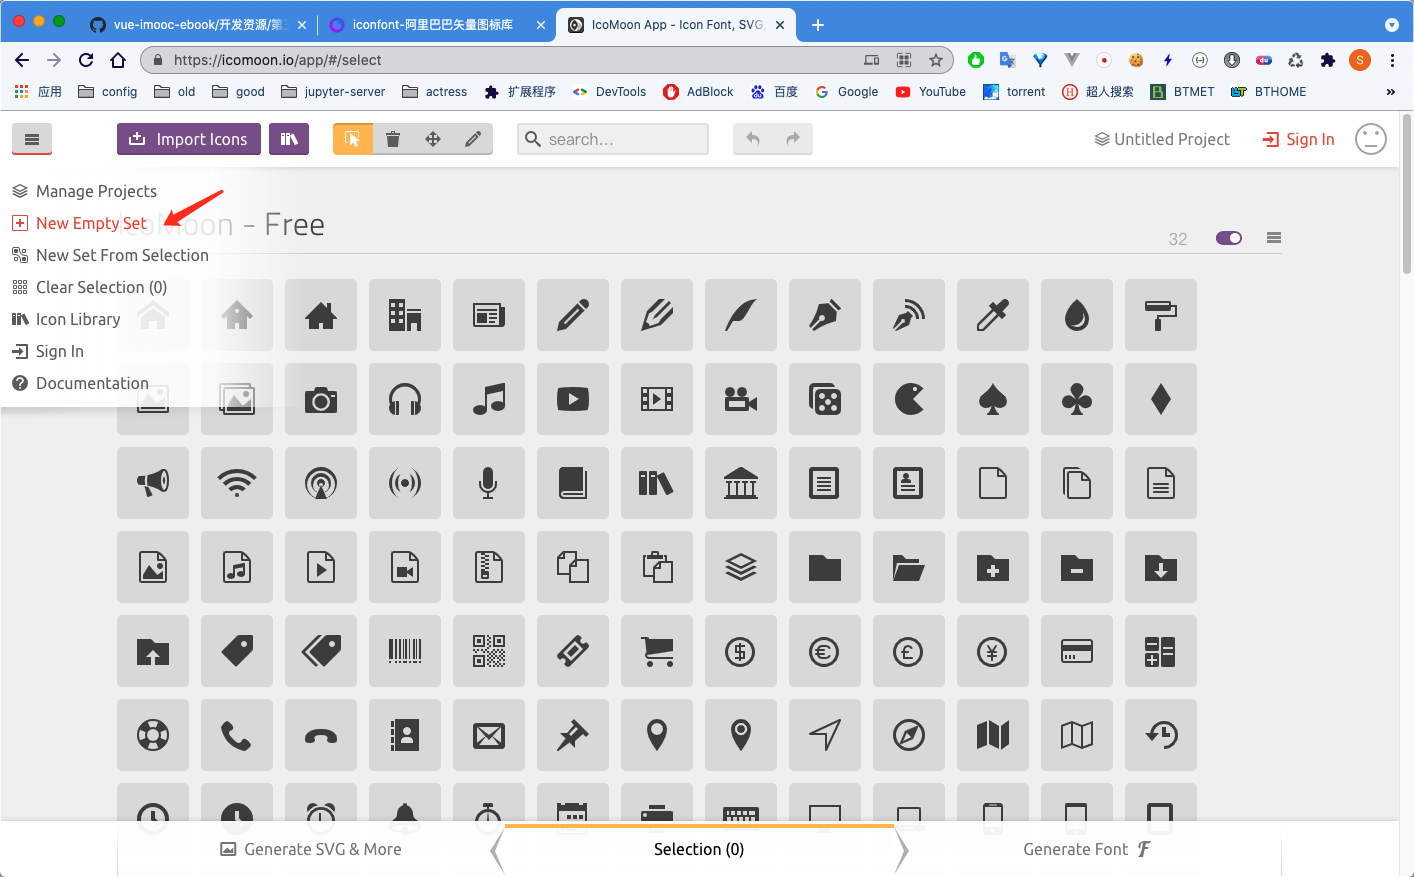
Step1:
选择New Empty Set
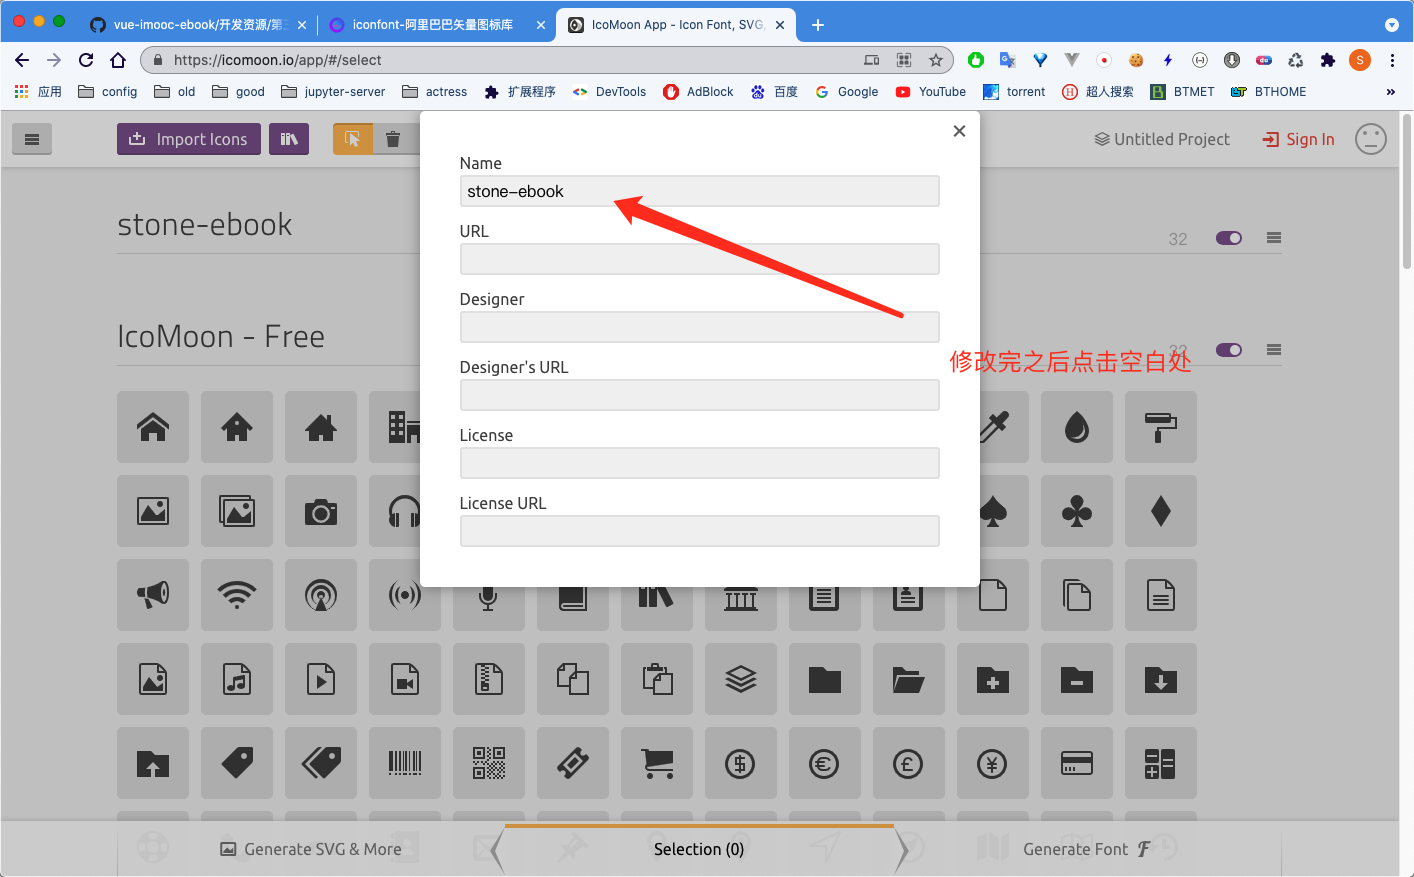
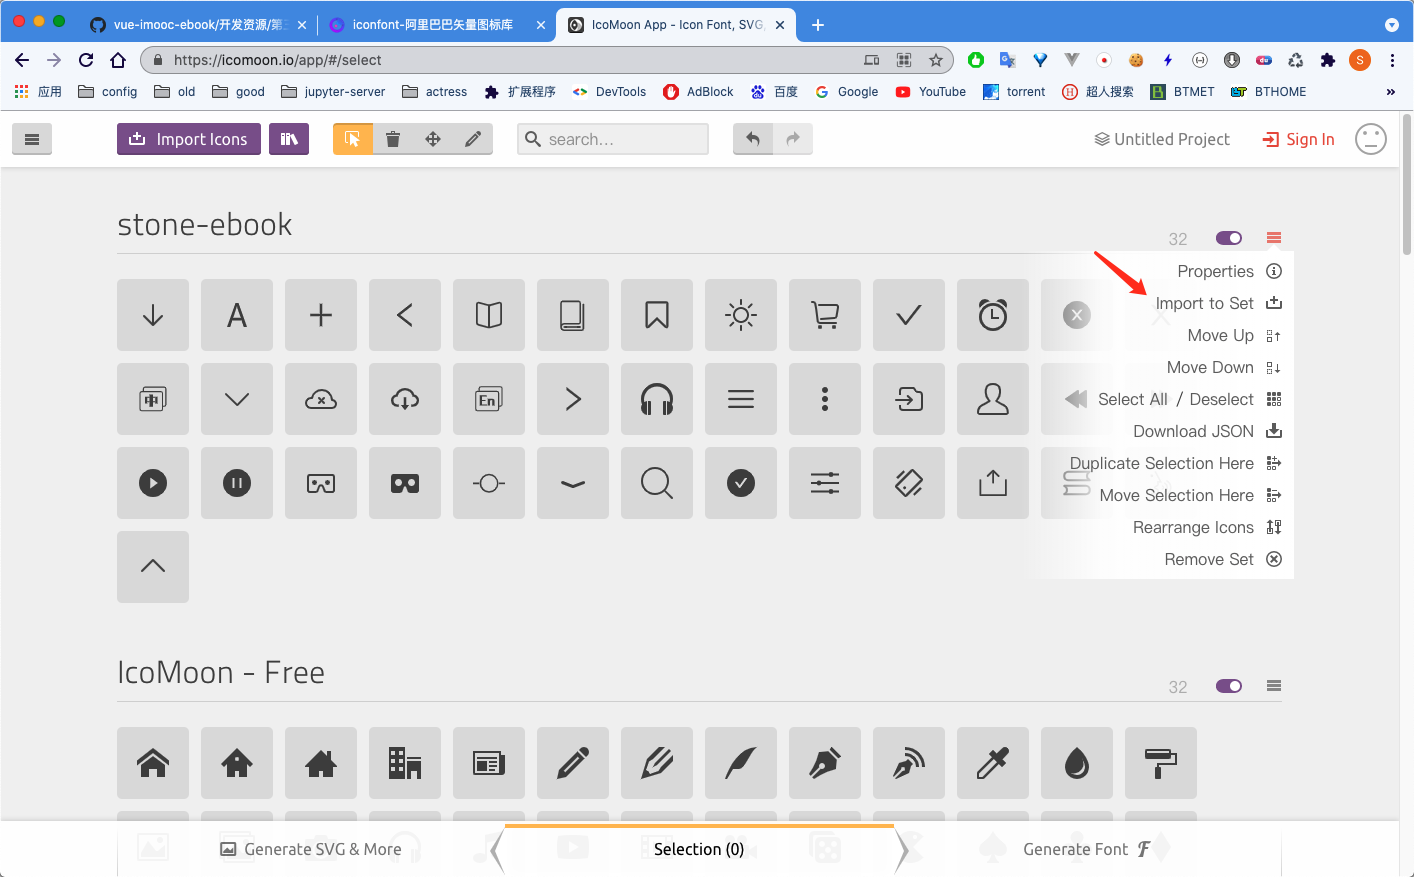
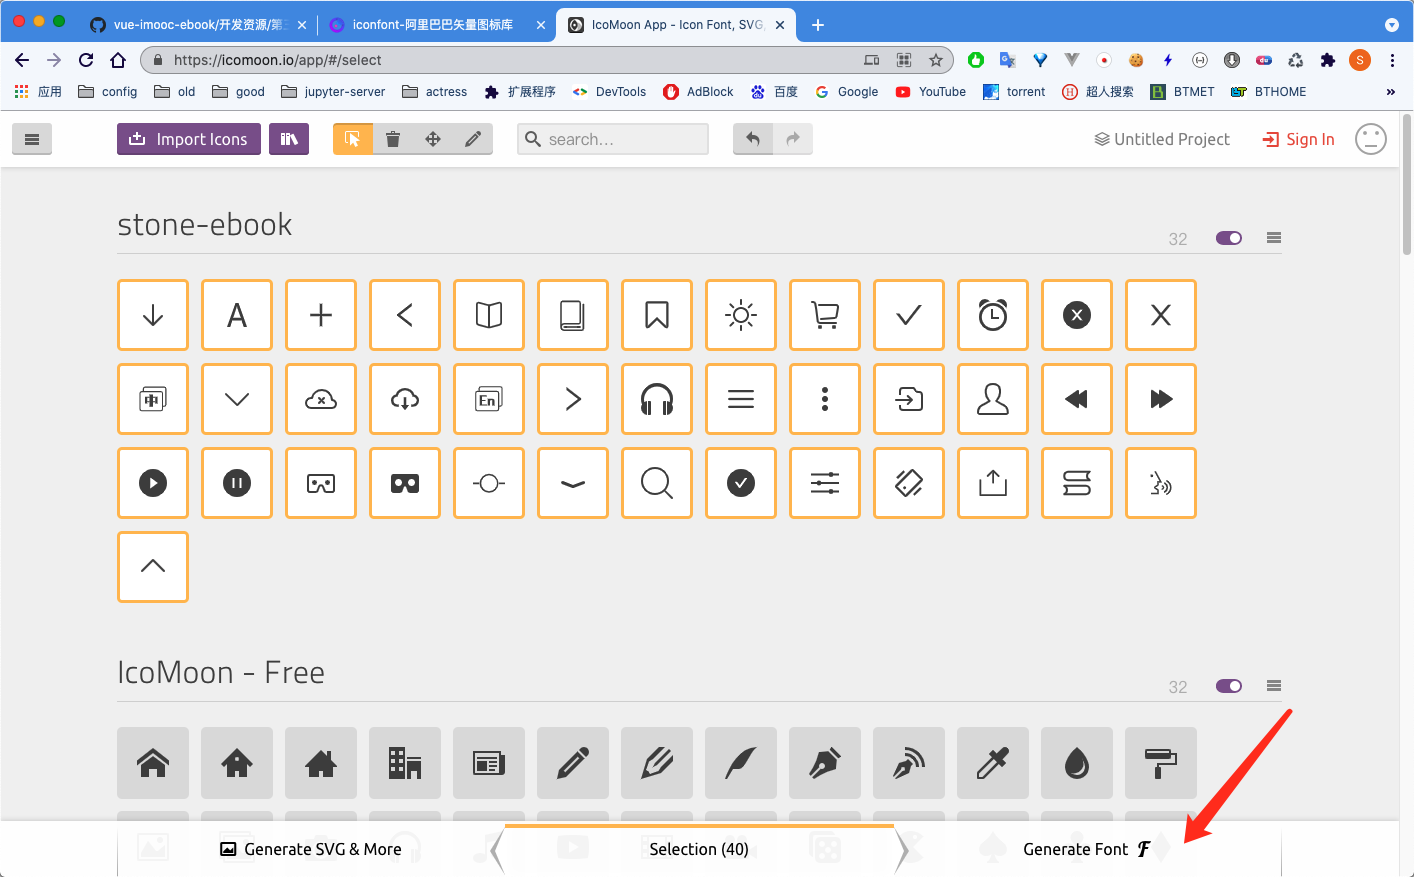
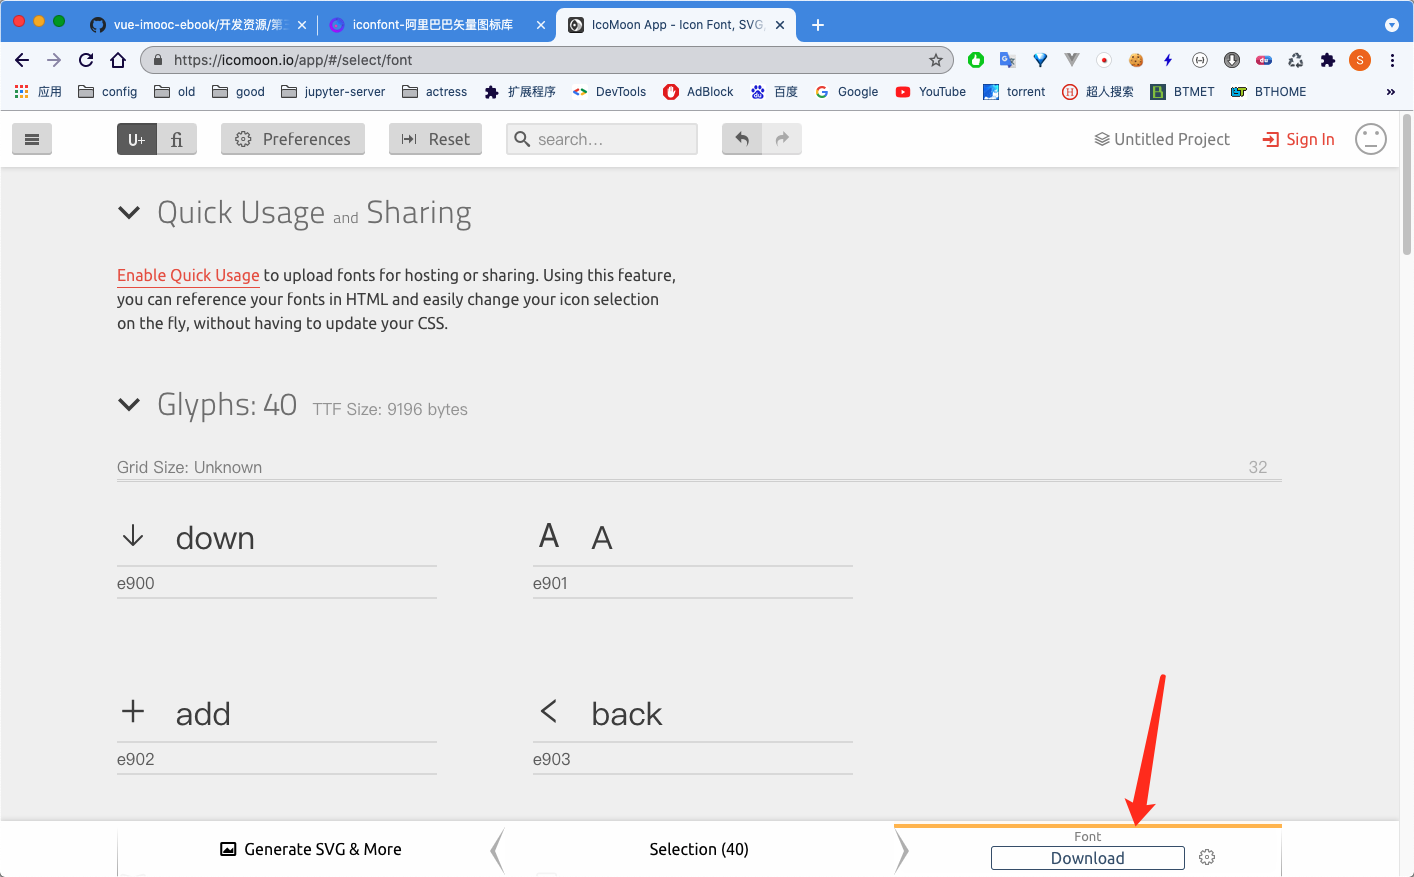
下载之后 扩展名是 .txt 改成 .zip 解压
vue cli 3.0下配置开发环境下的sourcemap
https://blog.csdn.net/u010341392/article/details/90209946
vue 属性展开的写法
<draggable
    ref="draggable"
    v-model="editComponentList"
    v-bind="dragOptions"
    class="dragArea"
    @change="handleDragChange"
    @start="handlerStart"
>
computed: {
  dragOptions() {
    let obj = {
      animation : 300,
      group     : 'listComponentsGroup',
      disabled  : this.isPreview,
      ghostClass: 'ghost',
      // filter       : 'disabled',
      filter       : undefined,
      draggable    : '.draggableItem',
      tag          : 'div',
      swapThreshold: 0.3,
      // forceFallback: true
      // fallbackTolerance: 0
    }
    // console.log(obj);
    return obj
  },
v-bind="dragOptions"
当有flex:1时定义width:0的作用是什么?
如果没有设置width,当内部元素的内容大小超过平均分配的剩余空间时,元素的宽度等于内容大小,如果设置了width并且这个width的大小小于平均分配的剩余空间大小时,取平均分配的剩余空间; 当flex设置为 1 时 相当于 剩余空间大小 = 父元素的宽度 因此 平均的剩余空间大小等于 = 父元素的宽度 / 元素的个数 直接设置width为0可以保证元素宽度平分父元素宽度
elementUI使用scss自定义主题编译时Using / for division is deprecated and will be removed in Dart Sass 2.0.0.
https://blog.csdn.net/weixin_52369659/article/details/117949984
解决办法 使用通过scss自定义elementUI的主题时,若sass版本不对,编译时会警告Using / for division is deprecated and will be removed in Dart Sass 2.0.0. 虽然不影响正常编译,但是很影响心情,我们只需要在package.json文件里修改"sass": "~1.32.6"即可
使用scss文件修改elementUI自定义主题方法 Element 的 theme-chalk 使用 SCSS 编写,如果你的项目也使用了 SCSS,那么可以直接在项目中改变 Element 的样式变量。新建一个样式文件,例如 element-variables.scss,写入以下内容:
/ 改变主题色变量 / $--color-primary: teal;
/ 改变 icon 字体路径变量,必需 / $--font-path: '~element-ui/lib/theme-chalk/fonts';
@import "~element-ui/packages/theme-chalk/src/index";
之后,在项目的入口文件中,直接引入以上样式文件即可(无需引入 Element 编译好的 CSS 文件):
import Vue from 'vue' import Element from 'element-ui' import './element-variables.scss' Vue.use(Element)
需要注意的是,覆盖字体路径变量是必需的,将其赋值为 Element 中 icon 图标所在的相对路径即可。 ————————————————
版权声明:本文为CSDN博主「卬子」的原创文章,遵循CC 4.0 BY-SA版权协议,转载请附上原文出处链接及本声明。 原文链接:https://blog.csdn.net/weixin_52369659/article/details/117949984
剪贴板操作 Clipboard API 教程
http://www.ruanyifeng.com/blog/2021/01/clipboard-api.html
vue复制图片到剪切板_嘻嘻哈哈的疯子的博客-程序员宅基地
vue复制图片到剪切板
最开始使用clipboard2,本地和测试环境都能运行,到了生产环境就无法粘贴到微信。
后来搜索到可以将图片转换成blod直接复制到剪切板,代码如下
<img :src="codeUrl" width="200px" id="img_body">
<el-button v-if="copyLink" type="text" @click="copyImg">复制二维码</el-button>
async copyImg(e) {
  var _this = this
  const img = document.querySelector('#img_body')
  const setToClipboard =  blob => {
    const data = [new ClipboardItem({ [blob.type]: blob })]
    return navigator.clipboard.write(data)
  }
  try {
      const response = await fetch(img.src)
      const blob =  await response.blob()
     setToClipboard(blob)
      _this.$message({
          message: '复制成功',
          type: 'success'
      })
  } catch (error) {
      _this.$message({
          message: '复制失败',
          type: 'error'
      })
  }
}
Vue Element-ui表单校验规则,你掌握了哪些?
http://www.fly63.com/article/detial/10500
https://www.cnblogs.com/alabo1999/p/14990310.html
5、参考文章
除了官网资料外,本文还参考了下列文章:
[1]、浅析async-validator源码,https://zhuanlan.zhihu.com/p/32306570?edition=yidianzixun&utm_source=yidianzixun&yidian_docid=0I5IikUl。
[2]、Vue中Element表单验证的基本要素, https://www.php.cn/js-tutorial-406545.html。
[3]、element-ui 表单校验 Rules 配置,https://www.cnblogs.com/loveyt/archive/2020/07/11/13282518.html。
[4]、Element Ui使用技巧——Form表单的校验规则rules详细说明,https://www.cnblogs.com/xyyt/p/13366812.html。
elementui form-item中多个字段校验
https://blog.csdn.net/palmer_kai/article/details/106586817
Element-UI validation on dynamic items generated by v-for
数组表单验证
You need to set :props dynamically using index and add rule inside the el-form-item. Check the jsfiddle here: https://jsfiddle.net/cgL6y9kq/34/
<el-form-item label="Description"
  :prop="'items.' + index + '.description'"
  :rules="{required: true, message: 'description is required', trigger: 'blur'}">
    <el-input v-model="item.description"></el-input>
</el-form-item>
CSS溢出显示点点点(单行、多行溢出点点点)
也是这个问题,搞定了。 //单行 overflow: hidden; text-overflow:ellipsis; white-space: nowrap; //多行 display: -webkit-box; -webkit-box-orient: vertical; -webkit-line-clamp: 3;/显示几行/ overflow: hidden;
QRCODE 扩展
https://blog.csdn.net/chy555chy/article/details/85785819
关于Vue项目中favicon.ico的应用配置&取消favicon.ico请求
https://blog.csdn.net/daisymao0205/article/details/111193299
<link rel="icon" href="data:;base64,=">
#
使pre的内容自动换行(转)
有个pre-wrap,保留空白符序列,但是正常地进行换行。
这样就OK了搞定,我们只要加上样式:
pre {
white-space: pre-wrap;
word-wrap: break-word;
}
:root {                    1
  font-size: 1em;          2
}

ul {
  font-size: .8rem;
}
- 1 伪类 :root 等价于 html 选择器
- 2 使用浏览器的默认字号大小(16px)
rem简化了很多em带来的复杂度。事实上,rem提供了一个在px和em间的相对单位折中解决方案,而且更易于使用。那么,是不是意味着你应该在对所有元素都使用rem,去掉其他长度单位呢?当然不是。
在CSS的世界里,这个答案通常是,看情况。rem只是你的工具箱中的其中一个。掌握CSS很重要的一点,就是学会分辨在什么场景下该使用什么工具。我的选择是,对font-size使用rem,对border使用px,对其他的度量方式如padding、margin、border-radius等使用em。然而在必要时,需要声明容器的宽度的话,我更喜欢使用百分比。
提示
当你不确定的时候,对font-size使用rem,对border使用px,以及对其他大多数属性使用em。
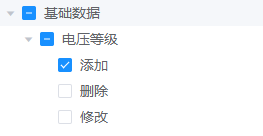
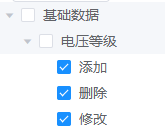
vue el-tree树形结构的check-strictly属性
element ui 的Tree 树形控件用起来其实很简单,如下:
其中,:data表示填充的数据,数据格式如下:
show-checkbox:表示节点是否可被选择
check-strictly:表示在显示复选框的情况下,是否严格的遵循父子不互相关联的做法,默认为 false。
check-strictly 为 false 时,如下所示:
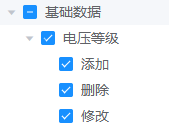
check-strictly 为 true 时,如下所示:
ReferenceError: primordials is not defined - when trying to generate theme variables file #80
根据楼上几位大佬的指点,我发现还是有很多朋友没法解决,我在个人博客总结了一下。可以尝试阅读解决:
如果不想点开,我大致总结下:
npm i element-themex element-theme-chalk -D装这两个就可以了。
其它的跟官方文档一样,
node_modules/.bin/et -i创建默认的配置文件
element-variables.scss,根据需要修改后再执行node_modules/.bin/et进行编译,可能会出现非常多的红色提醒,无视也行。
具体细节可参见顶部提到的文章总结
thank you very much! that work for me
js文件生成d.ts
npm i dtsmake -g
npm i tern --save-dev
dtsmake -s fileame.js
详情:http://npm.taobao.org/package/dtsmake
第二种方法:tsc
全局安装typescript
npm install typescript -g
测试安装是否成功
tsc --version 使用:
后缀名改为.ts
cp ./path-to/my-file.js ./my-file.ts
从.ts生成d.ts
tsc --declaration my-file.ts
.gitignore 里添加 文件夹之后 , 需要把这个文件夹 删除 再提交一次,之后就不会追中这个文件夹了
element form 校验数组每一项
<el-dialog
           :title="title"
           :visible.sync="visable"
           width="40%"
           :before-close="cancel">
  <el-form label-width="80px" :model="formData" :rules="formDataRules" ref="formData" >
    <el-form-item label="Id" prop="id" v-if="formData.id">
      {{formData.id}}
    </el-form-item>

    // begin ---------------------
    <div v-for="(item, index) in formData.test" :key="index">
      <el-form-item label="test1" :prop="`test[${index}].test1`" :rules="{ required: true, message: '请输入test1', trigger: 'blur' }">
        <el-input type="text" v-model="item.test1"></el-input>
      </el-form-item>
      <el-form-item label="test2" :prop="`test[${index}].test2`" :rules="{ required: true, message: '请输入test2', trigger: 'blur' }">
        <el-input type="text" v-model="item.test2"></el-input>
      </el-form-item>
    </div>
    // end ---------------------

  </el-form>
  <div slot="footer" class="dialog-footer">
    <el-button @click="cancel">取 消</el-button>
    <el-button type="primary" @click="save('formData')">确 定</el-button>
  </div>
</el-dialog>
Promise 中的三兄弟 .all(), .race(), .allSettled()
Daemon option. #223
npm i forever http-server -g
forever start `which http-server`
forever start `httpserver -p 8000`
nohup forever start `http-server -p 8000` &
pm2 启动 http-server 静态服务器
http-server
http-server是基于node.js的一个简单、零配置的命令行web服务器,用来做静态服务器非常方便。

相关介绍可参考:https://blog.csdn.net/ithanmang/article/details/88375259

常规使用方法是在根目录下运行命令:

http-server <path> -a 127.0.0.1 -p <端口号>
启动后按 ctrl + c 键可结束进程

pm2 启动 http-server 服务器
如果想要用 pm2 来守护 http-server 服务器的进程,可运行以下命令

pm2 start /usr/bin/http-server --name <任务名> -- -p <端口号> -d false
其中,/usr/bin/http-server 为 http-server 包的安装目录,可根据实际情况修改

服务启动后,输入命令 pm2 list 查看任务,如下:

1.jpg
参考资料
https://stackoverflow.com/questions/31804966/running-nodejs-http-server-forever-with-pm2

作者:yuho_小豪哥
链接:https://www.jianshu.com/p/a476ee08b5f1
来源:简书
著作权归作者所有。商业转载请联系作者获得授权,非商业转载请注明出处。
element UI table表格树形结构,子级不刷新。
https://blog.csdn.net/weixin_47641768/article/details/112987531
el-table-tree 更新数据被缓存,重新加载不能更新load获取的数据
this.$set(this.$refs.table.store.states.lazyTreeNodeMap, row-key, []); // 重置一下缓存
    handleInput(value, scope,property) {
      dlog('__func__', arguments, false)
      this.$set(scope.row, property, value)
      // this.symbolKey = Symbol(new Date().toString())
      this.$set(this.$refs.table.store.states.lazyTreeNodeMap, scope.row.id, []); // 重置一下缓存
    },
    handleInputDatePicker(value, scope) {
      dlog('__func__', arguments, false)
      this.$set(scope.row, 'signupTime', value)
      let signupTime = scope.row.signupTime
      if (signupTime && signupTime.length == 2) {
        scope.row.signupStartTime = signupTime[0]
        scope.row.signupEndTime   = signupTime[1]
      }else{
        scope.row.signupStartTime = ''
        scope.row.signupEndTime   = ''
      }
      // this.symbolKey = Symbol(new Date().toString())
      console.log('this.$refs.table.store.states = ',this.$refs.table.store.states);
      console.log('this.$refs.table.store.states = ',this.$refs.table.store.states);
      console.log('this.$refs.table.store.states = ',this.$refs.table.store.states);
      this.$set(this.$refs.table.store.states.lazyTreeNodeMap, scope.row.id, []); // 重置一下缓存
    },
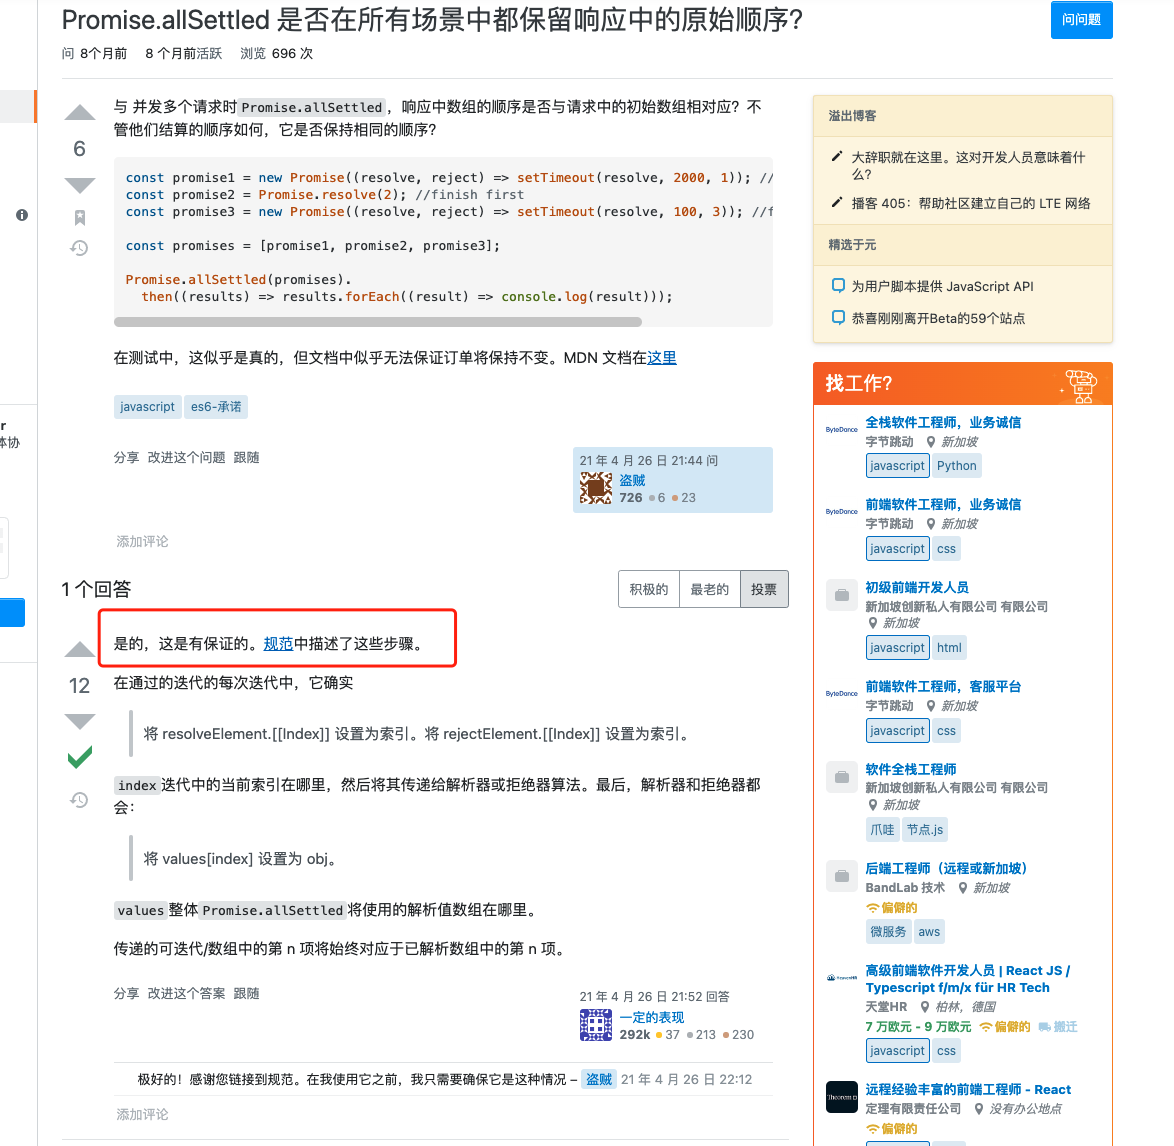
Promise.allSettled 是否在所有场景中都保留响应中的原始顺序?
给el-button添加点击防抖功能

2021.06.07 13:52:48字数 43阅读 177
给el-button添加点击防抖功能,防止误双击、短时间内多次点击等情况下多次触发click事件。 在main.js中:
Vue.component("ElButton").mixin({
  data() {
    return {
      debounce: false
    }
  },
  methods: {
    //覆盖el-button的点击事件,使用的是vue2.5.2,发现为直接覆写了原方法
    handleClick(evt) {
      if (this.debounce) {
        this.$message.warning("点太快了");
      } else {
        this.debounce = true;
        this.$emit('click', evt);
        setTimeout(() => {
          this.debounce = false;
        }, 1000);//延时时间
      }
    }
  }
})
获取qq邮箱的授权码和SMTP server
端口:465 SMTP 服务器 : smtp.qq.com
一、什么是授权码,它又是如何设置?
1、什么是授权码?
授权码是QQ邮箱推出的,用于登录第三方客户端的专用密码。 适用于登录以下服务:POP3/IMAP/SMTP/Exchange/CardDAV/CalDAV服务。 温馨提醒:为了你的帐户安全,更改QQ密码以及独立密码会触发授权码过期,需要重新获取新的授权码登录。
2、怎么获取授权码?
登录qq邮箱:先进入设置-》帐户页面找到入口,按照以下流程操作。

邮箱授权码.png

邮箱授权码2.png

邮箱授权码3.png
(1)点击“开启”

邮箱授权码4.png
(2)验证密保

邮箱授权码5.png
(3)获取授权码

邮箱授权码6.png
授权码:gzoyimtltnqsbdba #是自己的邮箱授权码
3、在第三方客户端怎么设置?**
在第三方客户端的密码框里面输入16位授权码进行验证。
二、获取SMTP server
1、进入qq邮箱帮助

SMTP server 获取1.png

SMTP server 获取2.png

SMTP server 获取3.png
使用Typescript重构axios(二十六)——添加HTTP授权auth属性
import axios from "../../src/axios";

axios.get("/api/HTTPAuthorization", {
   auth:{
     username: 'NLRX',
     password: '123456'
   }
  })
  .then(res => {
    console.log(res);
  });
接着在 server/server.js 添加新的接口路由:

const atob = require("atob");
// 添加HTTP授权
router.get("/api/HTTPAuthorization", function(req, res) {
  const auth = req.headers.authorization;
  const [type, credentials] = auth.split(" ");
  const [username, password] = atob(credentials).split(":");
  res.json({
    type: type,
    username: username,
    password: password
  });
});
Vue中this.$router.resolve实现页面跳转并传参(在新窗口打开页面)
let lybl = '';

lybl = this.$router.resolve(
{
path: 'EnterpriseReport',
query:{
    ancheid: id , ancheyear: ancheyear
}})

window.open(lybl.href, '_blank');
nuxt.js + pm2 部署
https://blog.csdn.net/fxss5201/article/details/105337118
pm2 start npm --name "name" -- run start
unpkg 国内镜像,只有国外出名的 才会有同步
https://unpkg.zhimg.com/lodash@4.17.21/lodash.min.js
代码块
https://juejin.cn/post/6844903924877492237
1. 我们的程序都是由一条一条的语句构成的,语句的执行顺序是从上到下一条一条的执行
2. 在JS中,可以使用{}为语句进行分组
3. 同一个{}中的所有语句,称为一组语句,他们是要么全部执行,要么全部都不执行
4. 一个{}中的整体,我们就称之为代码块;在JS中,{}只是具有分组的作用,在代码块内定义的数据,在外部是可以访问的
{
  var a='你好';
    console.log('你好');
    alert('你好');
}
alert(a)  //返回 你好
复制代码
####5. 在代码块的后面,可以不用写 ;
作者:五月song 链接:https://juejin.cn/post/6844903924877492237 来源:稀土掘金 著作权归作者所有。商业转载请联系作者获得授权,非商业转载请注明出处。
深入探究javascript的 {} 语句块
今日学习解析json字符串,用到了一个eval()方法,解析字符串的时候为什么需要加上括号呢?摸不着头脑。原来javascript中{}语句块具有二义性,不加括号会出错,理解这种二义性对我们理解javascript代码有极大帮助。
一、{}语句块的两个含义
- 表示语句块 a. 在javascript中可以使用{}来括起代码,在编辑器中方便管理代码。因为javascript并没有块级作用域,所以这种写法是无害的。
{
    //some code...
}
b. 在javascript中 ,条件判断语句,循环语句,函数都需要{}语句块来整合代码
- 对象字面量
var box = {
    name:'kuoaho',
    age:21
}
//此时{code}作为表达式,可以赋值给一个变量
//其实对象字面量就是可以生成对象值的表达式
二、那如果对象字面量不作为一个赋值表达式,会发生什么情况呢?
example:
    {name:'kuoao'}        //没有报错,但是也没有创建对象
    {name:'kuohao',age}   //报错
由上面可以看出对象字面量只能够作为表达式赋值,第一种写法没有错,只是javascript将它作为一个label语句解析了。
analysis:
    {name:'kuoao'}

       //{}一个语句块
      // name:'kuohao',一个label语句,用于标记for循环
三、但是问题又来了……
{
name:'kuohao',
age:21
}
//这样为什么会报错?这不是对象字面量的写法吗?
因为javascript中{}的二义性,{}不仅仅被认为是对象字面量而且还会被认为是代码块。
analysis:
    {
    name:'kuohao',
    age:21
    }
一个代码块,两条label语句,如果没有逗号,是完全没有问题的,所以关键在于逗号,语句的分隔应该使用分号,所以javascript会判定这是语法错误
四、正确的写法
({
    name:'kuohao',
    age:21
    })

    //正确的写法
()会把语句转换成表达式,称为语句表达式,对象字面量不是表达式吗?为什么还需要()来转换?
加上括号以后,就可以消除这种二义性,因为括号里的代码都会被转换为表达式求值并且返回,因此语句块也就变成了对象字面量,也可以得出,对象字面量必须作为表达式而存在
作者:kuohao 链接:https://www.jianshu.com/p/2f3b7d2b1f59 来源:简书 著作权归作者所有。商业转载请联系作者获得授权,非商业转载请注明出处。
JS:代码块{},及代码块的作用是什么?
在JS中可以使用大括号{}来为语句进行分组。 同一个{}中的语句我们称为时一组语句,它们要么都执行,要么都不执行,一个{}中的语句也叫做一个代码块。 举例:
{ // 这是一组语句 console.log(123); console.log('hello'); alert(true); }
{ // 这是另一组语句 console.log('abc'); console.log('hello'); alert('你好'); }
另外,JS中的代码块{}只具有分组的作用,没有任何其他用途,代码块内的内容,在外部都是完全可见的。 举例:
{ var a = '123'; } console.log(a); // 输出123 ———————————————— 版权声明:本文为CSDN博主「奄奄一息的一条咸鱼」的原创文章,遵循CC 4.0 BY-SA版权协议,转载请附上原文出处链接及本声明。 原文链接:https://blog.csdn.net/weixin_46682277/article/details/113881279
组件 自动挡
<template>
  <div class="zt-component-root">
    <div class="zt-item-wrapper">
      <el-form ref="form" class="custom-form" :rules="rules" :inline="false" :model="widget">

        <el-form-item prop="componentName" :style="{marginBottom: widget.hasOwnProperty('componentSource') && widget.componentSource == 2 ? '18px': '8px'}">
          <div class="zt-component-container">
            <div class="field-item-wrapper">
              <template v-if="widget.hasOwnProperty('componentSource') && widget.componentSource == 2">
                <el-input v-model="widget.componentName" size="medium" placeholder="请输入报名项名称"></el-input>
              </template>
              <template v-else>
                <div style="flex: 1 1 auto;position: relative;height: 32px;">
                  <p class="title-text">{{ widget.componentName }}</p>
                </div>
              </template>
            </div>
            <div style="width: 88px;"><span class="input-name">{{ widget.componentCode | componentCodeFormat }}</span></div>
            <div class="required-wrapper">
              <cz-program-checkbox :disabled="widget.defaulted == 1" v-model="computedWidgetRequired"></cz-program-checkbox>
            </div>
            <div class="sort-wrapper">
              <img class="sort-up" src="@/assets/img/resources/up@2x.png" style="" alt="" @click="$emit('index-up',widget)">
              <img class="sort-down" src="@/assets/img/resources/down@2x.png" style="" alt="" @click="$emit('index-down',widget)">
              <!-- <span class="iconfont icon-ketuozhuai custom-handle" style="cursor: move"></span>-->
              <img class="sort-drag custom-handle" src="@/assets/img/resources/drag@2x.png" alt="">
            </div>
            <div class="operation-wrapper">
              <template v-if="widget.defaulted == 1">
                <!-- <span class="operation-lock el-icon-lock custom-handle"></span>-->
                <img class="operation-lock custom-handle" src="@/assets/img/resources/lock@2x.png" alt="">
              </template>
              <template v-else>
                <img class="operation-delete" src="@/assets/img/resources/delete@2x.png" alt="" @click="$emit('delete-component',widget)">
              </template>
            </div>
          </div>
        </el-form-item>

        <el-form-item prop="componentTip">
          <el-input class="tip-item" size="medium" placeholder="该报名项填写注意事项" v-model="widget.componentTip"></el-input>
        </el-form-item>

        <el-form-item prop="items">
          <!-- :disabled="true"-->
          <el-input
              :disabled="widget.defaulted == 1"
              class="answer-item"
              type="textarea"
              :autosize="{ minRows: 5, maxRows: 10}"
              placeholder="多个选项填写在此,以回车分离,例如以下:
男
女
保密"
              :value="computedWidgetItems"
              @input="handleInput"
          >
          </el-input>
        </el-form-item>
      </el-form>
    </div>
    <span v-if="!widget.optionList">{{ widget.optionList }}</span>
    <!--
      id               : getUUID(), // integer
      componentCode    : 'ZtHeight', // string 组件代码(前端样式绑定)
      componentField   : 'userHeight', // string 组件代码(组件绑定db字段)
      componentName    : '身高', // string 组件名称
      componentType    : 'input', // integer 组件类型
      componentTip     : '', // string 组件提示
      componentSource  : '', // integer 组件来源 1-平台 2-自定义
      createTime       : '', // string 创建时间
      createUser       : '', // integer 创建人编码
      defaulted        : 0, // integer 是否默认(0否 1是)
      deleted          : '', // integer 是否被删除 0-否 1-是
      sortNumber       : '', // integer 排序序号
      updateTime       : '', // string 修改时间
      updateUser       : '', // integer 修改人编码
      required         : 0, // integer 是否必填(0否 1是)
    -->
    <!--        <c-pre>{{ widget.items }}</c-pre>-->
  </div>
</template>

<script type="text/ecmascript-6">

import ComponentMixin       from './component-mixin'

import ComponentExtends from './component-extends'

export default {
  extends   : ComponentExtends,
  mixins    : [ComponentMixin],
  components: {},
  name      : 'ZtRadio',
  props     : {
    className: { type: String, default: '' },
    widget   : { type: Object, required: true },
  },
  watch     : {
    'widget.optionList': {
      handler  : function (val, oldVal) {
        console.log(`this.hasChange = `, this.hasChange)
        if (!this.hasChange) {
          if (val && val.length > 0) {
            this.$set(this.widget, 'items', val.map(item => item.optionName).join('\n'))
          }
        }
      },
      deep     : true,
      immediate: true,
    },
  },
  data() {
    return {
      rules    : {},
      hasChange: false,
    }
  },
  computed: {
    computedWidgetItems: {
      // getter
      get() {
        if (!this.widget.hasOwnProperty('items')) {this.$set(this.widget, 'items', '')}

        return this.widget.items
      },
      // setter
      set(newValue) {
        this.widget.items = newValue
      },
    },
  },
  methods : {
    handleInput(val) {
      this.hasChange = true
      console.log(`val = `, val)
      console.log('%c【ZtRadio:136】-:', 'color:orange', 'call handleInput')
      const optionList         = val.split('\n').filter(item => item.trim()).map((item, index) => {
        return {
          optionValue: index + 1,
          optionName : item,
        }
      })
      this.widget.optionList   = optionList
      this.computedWidgetItems = val
    },
  },
  created() {
    // document.documentElement.scrollTop = 0
  },
  destroyed() {},
  mounted() {},
}
</script>

<style scoped lang="scss" rel="stylesheet/scss">
@import "component.scss";

</style>
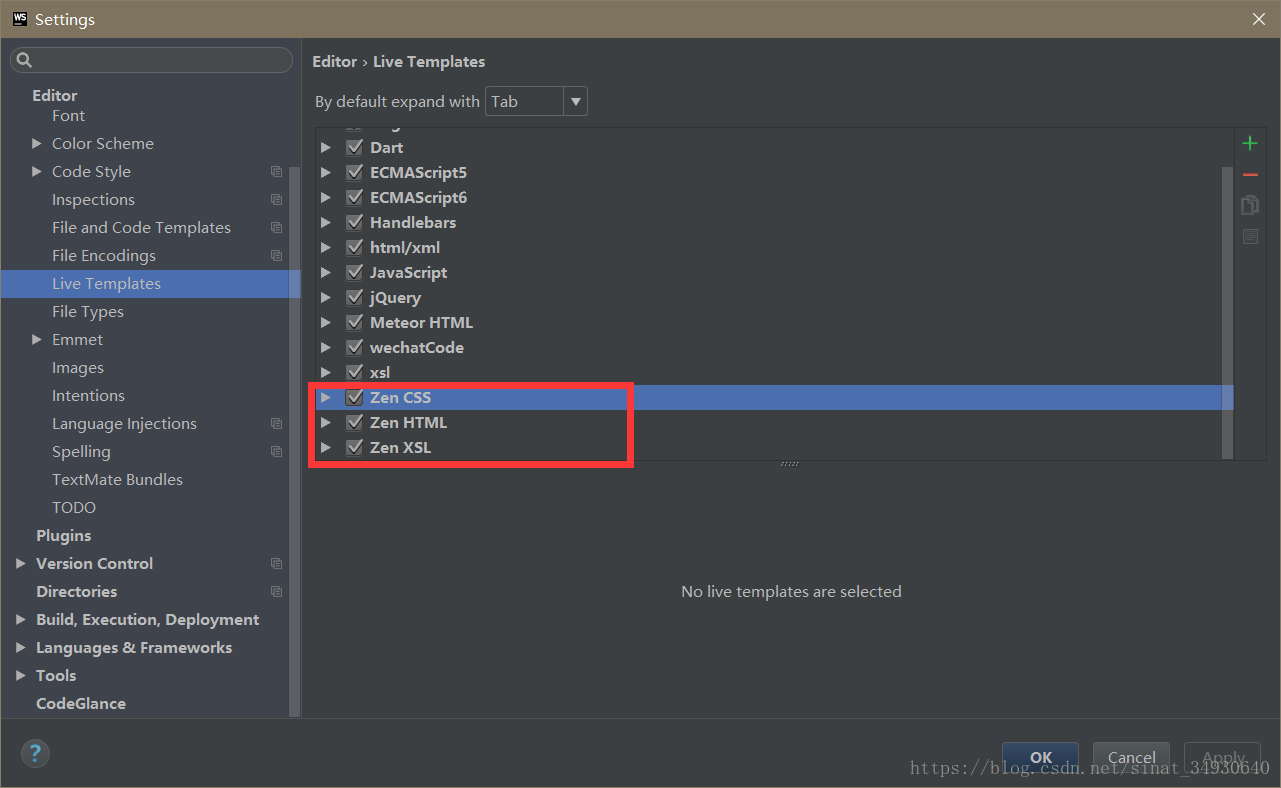
webstorm中 emmet 模板的修改步骤
https://blog.csdn.net/sinat_34930640/article/details/79712419
~/.vuerc
~/.vuerc
vue的生命周期
vue的生命周期
https://blog.csdn.net/wei_dan1129/article/details/105628410
beforeCreate(创建前) -> created(创建后) -> berforeMount(载入前) -> mounted(载入后) -> beforeUpdate(更新前) -> updated(更新后) -> beforeDestory(销毁前) -> destoryed(销毁后) 1 完整的Vue new Vue({ el: "", data: { }, computed: { //computed是计算属性,也就是依赖其它的属性计算所得出最后的值 //1、computed内部的函数在调用时不加()。 //2、computed是依赖vm中data的属性变化而变化的,也就是说,当data中的属性发生改变的时候,当前函数才会执行,data中的属性没有改变的时候,当前函数不会执行。 //3、computed中的函数必须用return返回。 //4、在computed中不要对data中的属性进行赋值操作。如果对data中的属性进行赋值操作了,就是data中的属性发生改变,从而触发computed中的函数,形成死循环了。 //5、当computed中的函数所依赖的属性没有发生改变,那么调用当前函数的时候会从缓存中读取。 }, watch: { //watch是去监听一个值的变化,然后执行相对应的函数。 //1、watch中的函数名称必须要和data中的属性名一致,因为watch是依赖data中的属性,当data中的属性发生改变的时候,watch中的函数就会执行 //2、watch中的函数有两个参数,前者是newVal,后者是oldVal。 //3、watch中的函数是不需要调用的。 //4、watch只会监听数据的值是否发生改变,而不会去监听数据的地址是否发生改变。也就是说,watch想要监听引用类型数据的变化,需要进行深度监听。"obj.name"(){}------如果obj的属性太多,这种方法的效率很低,obj:{handler(newVal){},deep:true}------用handler+deep的方式进行深度监听。 //5、特殊情况下,watch无法监听到数组的变化,特殊情况就是说更改数组中的数据时,数组已经更改,但是视图没有更新。更改数组必须要用splice()或者$set。this.arr.splice(0,1,100)-----修改arr中第0项开始的1个数据为100,this.$set(this.arr,0,100)-----修改arr第0项值为100。 //6、immediate:true 页面首次加载的时候做一次监听。 }, components: { //组件通信 用于父组件内 引用组件 }, props: { //组件通信 用于子组件内 接收父组件传递给子组件的数据 }, methods: { //事件方法执行 }, created() { //html加载完成之前,执行。执行顺序:父组件-子组件 }, mounted() { //html加载完成后执行。执行顺序:子组件-父组件 } }); computed与watch的区别: 1、功能上:computed是计算属性,watch是监听一个值的变化,然后执行对应的回调。
2、是否调用缓存:computed中的函数所依赖的属性没有发生变化,那么调用当前的函数的时候会从缓存中读取,而watch在每次监听的值发生变化的时候都会执行回调。
3、是否调用return:computed中的函数必须要用return返回,watch中的函数不是必须要用return。
4、使用场景:computed----当一个属性受多个属性影响的时候,使用computed-------购物车商品结算。watch----当一条数据影响多条数据的时候,使用watch-------搜索框。 1 2 3 4 5 6 7 8 9 10 11 12 13 14 15 16 17 18 19 20 21 22 23 24 25 26 27 28 29 30 31 32 33 34 35 36 37 38 39 40 41 42 43 44 45 Vue执行流程 beforeCreate调用 在实例初始化之后,数据观测 (data observer) 和 event/watcher 事件配置之前被调用。
在这个钩子函数里,只是刚开始初始化实例,你拿不到实例里的任何东西,比如data和methods和事件监听等。
data: { msg: 'linlin' }, methods: { getLists(){ return 'aaa' } }, beforeCreate() { console.log('beforeCreate',this.msg,this.getLists()) } 1 2 3 4 5 6 7 8 9 10 11 执行结果报错
new Vue
从 new Vue开始作为入口,Vue只是一个简单的构造函数 1 function Vue (options) { this._init(options) } 1 2 3 进入_init函数后,先初始化了一些属性,然后开始第一个生命周期
callHook(vm, 'beforeCreate') 1 至此beforeCreate被调用完成 beforeCreate之后开始进行初始化
==========================================
created调用 在实例创建完成后被立即调用。在这一步,实例已完成以下的配置:数据观测 (data observer),属性和方法的运算,watch/event 事件回调。然而,挂载阶段还没开始,$el 属性目前尚不可用。
这是最早能拿到实例里面的数据和方法的一个钩子函数。应用场景:异步数据的获取和对实例数据的初始化操作都在这里面进行。
data: { msg: 'linlin', imgs: null }, methods: { getLists(){ this.$http.get(url).then(res=>{ this.imgs = res.data.lists console.log(this.imgs) }) } }, created() { this.getLists() } 1 2 3 4 5 6 7 8 9 10 11 12 13 14
15
beforeMount调用 在挂载开始之前被调用:相关的render函数首次被调用。
data: { arr: [1,2,3], }, methods: { getAdd(){ this.arr = [4,5,6,7] } }, updated() { console.log(this.arr) } 1 2 3 4 5 6 7 8 9 10 11 12 13 14 15 16 17 18
如果想分别区别不同的数据更新,同时要对dom进行操作那么需要使用nextTick函数处理
nextTick(),是将回调函数延迟在下一次dom更新数据后调用 简单的理解是:当数据更新了,在dom中渲染后,自动执行该函数 created()钩子函数进行的DOM操作一定要放在Vue.nextTick()的回调函数中
created() { setTimeout(()=>{ this.arr = [4,5,6,7] this.$nextTick(()=>{ console.log('nextTick',document.querySelectorAll('li').length) }) }) setTimeout(()=>{ this.arr = [10,11,12,13,14] this.$nextTick(()=>{ console.log('nextTick',document.querySelectorAll('li').length) }) },1000)
}, 1 2 3 4 5 6 7 8 9 10 11 12 13 14 15 在created内执行nextTick nextTick在updated后执行
updated,watch和nextTick区别 updated对所有数据的变化进行统一处理 watch对具体某个数据变化做统一处理 nextTick是对某个数据的某一次变化进行处理 如果实例里面没写el挂载点你就需要在实例后面通过.$mount(’#app’)来手动触发
======================
beforeDestroy 实例销毁之前调用。在这一步,实例仍然完全可用
=======================
destroyed Vue 实例销毁后调用。调用后,Vue 实例指示的所有东西都会解绑定,所有的事件监听器会被移除,所有的子实例也会被销毁。
beforeDestroy和destroyed只能通过手动触发$destroy来调用
let app = new Vue({ beforeDestroy() { console.log('beforeDestroy') }, destroyed() { console.log('destroyed') }
}) app.$destroy() 1 2 3 4 5 6 7 8 9 10
Vue 的父组件和子组件生命周期钩子执行顺序是什么 1.加载渲染过程: 父beforeCreate->父created->父beforeMount->子beforeCreate->子created->子beforeMount->子mounted->父mounted 父组件挂载完毕肯定是等里面的子组件都挂载完毕后才算父组件挂载完毕了,所以父组件的mounted在最后。 2.子组件更新过程:(子组件更新影响父组件的情况) 父beforeUpdate->子beforeUpdate->子updated->父updated 3.子组件更新过程:(子组件更新不影响父组件的情况) 子beforeUpdate->子updated 4.父组件更新过程:(父组件更新影响子组件的情况) 父beforeUpdate->子beforeUpdate->子updated->父updated 5.父组件更新过程:(父组件更新不影响子组件的情况) 父beforeUpdate->父updated 6.销毁过程: 父beforeDestroy->子beforeDestroy->子destroyed->父destroyed ———————————————— 版权声明:本文为CSDN博主「wei_dan1129」的原创文章,遵循CC 4.0 BY-SA版权协议,转载请附上原文出处链接及本声明。 原文链接:https://blog.csdn.net/wei_dan1129/article/details/105628410
form-generator
const path = require('path')

const minify = process.env.NODE_ENV === 'development' ? false : {
  collapseWhitespace: true,
  removeComments: true,
  removeRedundantAttributes: true,
  removeScriptTypeAttributes: true,
  removeStyleLinkTypeAttributes: true,
  useShortDoctype: true,
  minifyCSS: true,
  minifyJS: true
}

function resolve(dir) {
  return path.join(__dirname, dir)
}

module.exports = {
  publicPath: process.env.NODE_ENV === 'production'
    ? '/form-generator/'
    : '/',
  pages: {
    index: {
      entry: 'src/views/index/main.js',
      template: 'public/index.html',
      filename: 'index.html',
      chunks: ['chunk-vendors', 'chunk-common', 'index'],
      minify
    },
    preview: {
      entry: 'src/views/preview/main.js',
      template: 'public/preview.html',
      filename: 'preview.html',
      chunks: ['chunk-vendors', 'chunk-common', 'preview'],
      minify
    }
  },
  devServer: {
    overlay: false
  },
  productionSourceMap: false,
  configureWebpack: {
    externals: {
      vue: 'Vue',
      'vue-router': 'VueRouter',
      'element-ui': 'ELEMENT'
    }
  },
  chainWebpack(config) {
    // set svg-sprite-loader
    config.module
      .rule('svg')
      .exclude.add(resolve('src/icons'))
      .end()
    config.module
      .rule('icons')
      .test(/\.svg$/)
      .include.add(resolve('src/icons'))
      .end()
      .use('svg-sprite-loader')
      .loader('svg-sprite-loader')
      .options({
        symbolId: 'icon-[name]'
      })
      .end()
  }
}
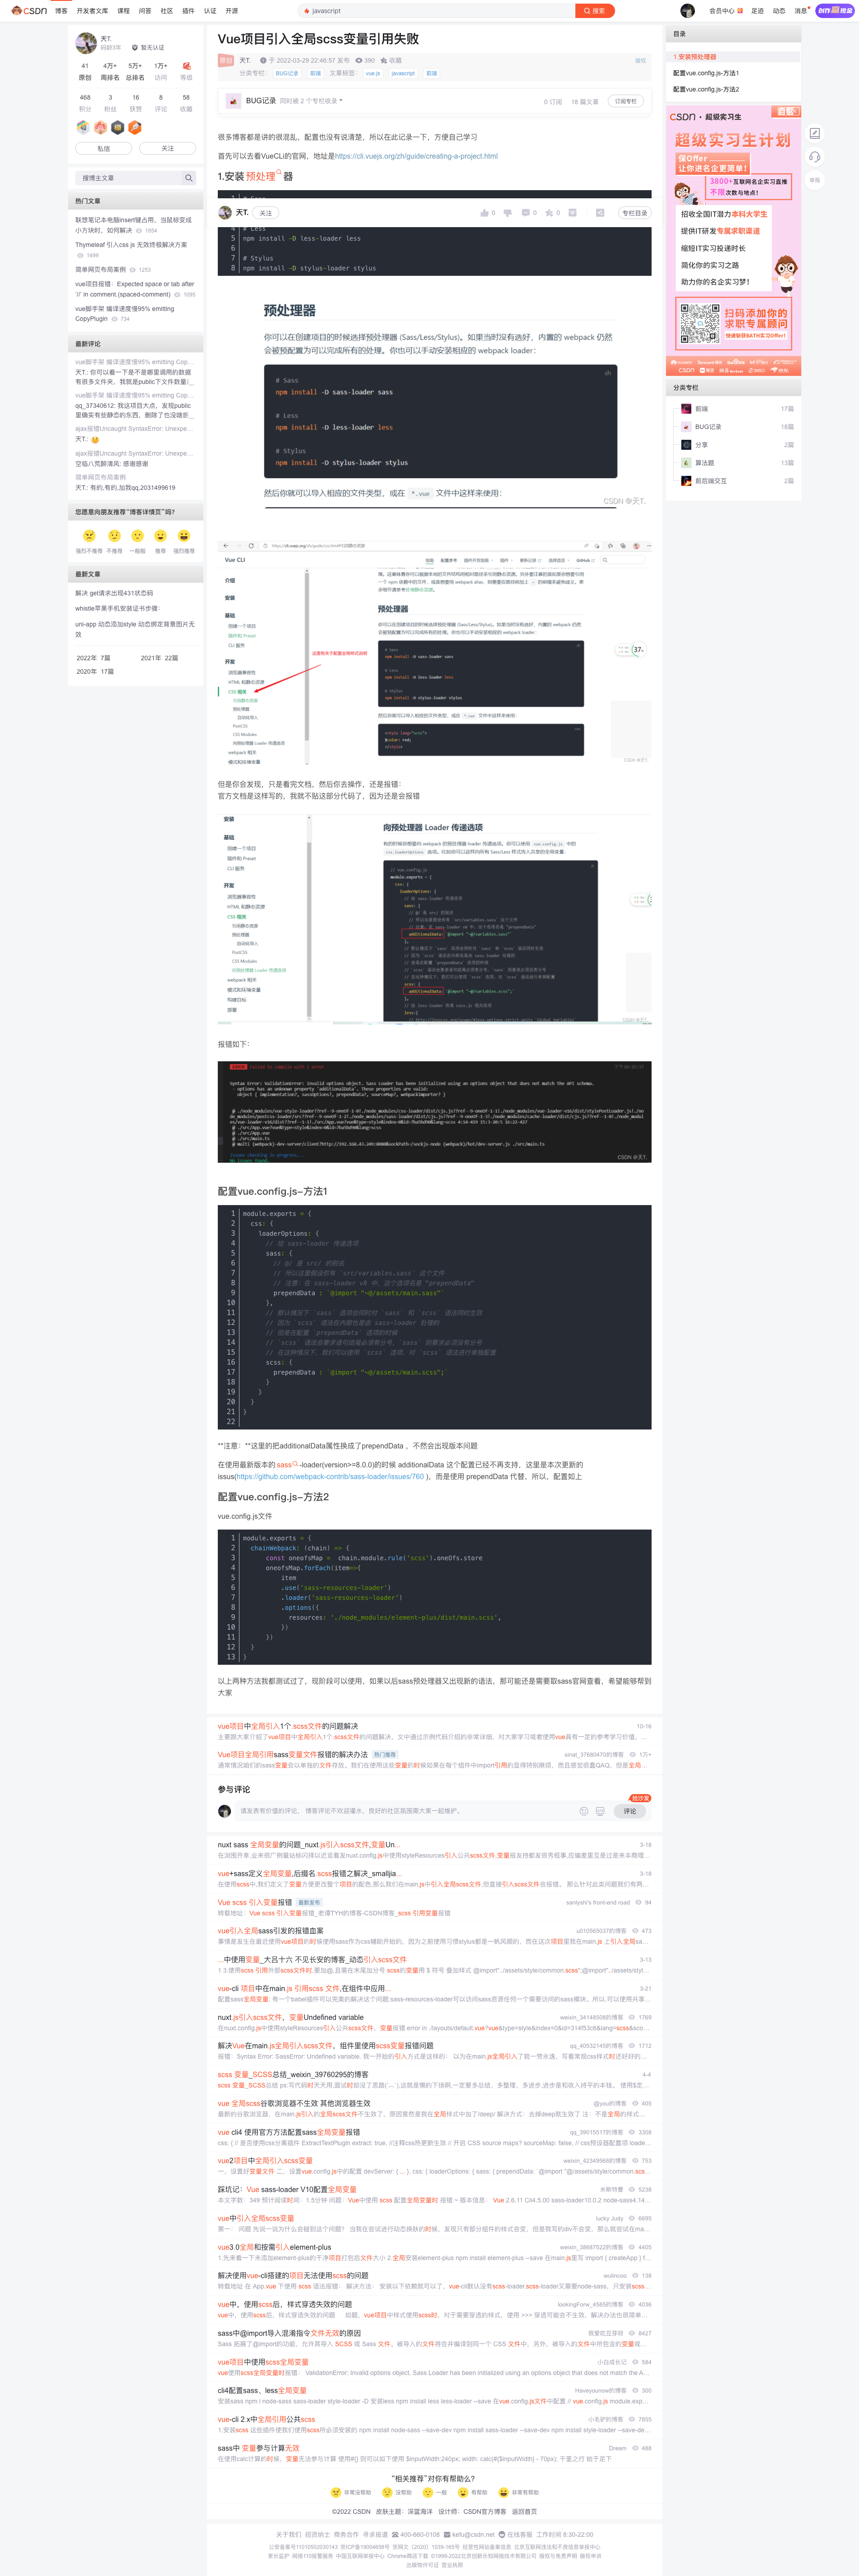
Vue项目引入全局scss变量引用失败
https://blog.csdn.net/qq_44859233/article/details/123834375
vue el-form 遇上 v-if,表单校验不生效问题
最近遇到一个坑,在用 element中 的 form 表单校验的时候,因为有些字段是根据特殊条件来设置显示隐藏的,所以用了 v-if 控制显示;但是发现用 v-if 控制的表单元素总是无法被校验。
咦???
所以,我就试试用 v-show 来控制表单元素,然而发现,用 v-show 来控制的表单元素在隐藏状态下时,表单也会校验这个字段。
关于 v-if 和 v-show 的区别,之前有例子比较过,传送门:v-show 和 v-if
查找资源,发现原因原来是: 【1】使用 v-if:element在对form表单中带有prop属性的子组件进行校验规则绑定时,是在vue声明周期mounted完成的。而v-if用来切换的元素是会被销毁的,导致了v-if内的表单项,由于在mounted时期没有进行渲染,所以规则也没有绑定上,因此初始化时不符合显示条件的不会生成规则,导致后面切换条件,显示的输入框的校验不会生效。 【2】使用 v-show:初始化时会生成所有的规则,即使隐藏了也会进行规则校验。
解决方法: 给设置 v-if 的元素加上key值,如下所示:
rules: { title: [{ required: true, message: '请输入活动名称,不能超过20个字', trigger: 'blur' }] } 1 2 3 原因:因为在v-if切换标签时,多个相同的标签被渲染,如果不添加key来区分则会出现复用的情况(同理,所以 v-for 渲染的标签也要加key来区分)。而原本这些标签每一个都是独立的,所以需要添加key来做区分。
参考链接:https://www.cnblogs.com/qdlhj/p/12332407.html ———————————————— 版权声明:本文为CSDN博主「*且听风吟」的原创文章,遵循CC 4.0 BY-SA版权协议,转载请附上原文出处链接及本声明。 原文链接:https://blog.csdn.net/HH18700418030/article/details/119763248
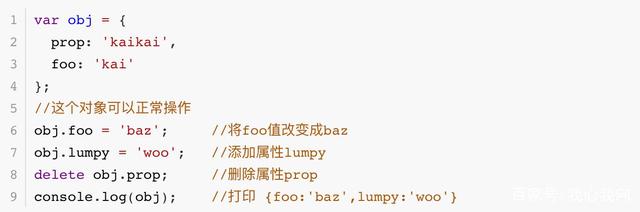
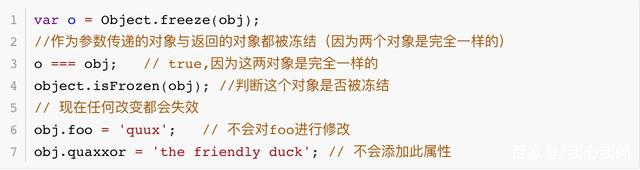
Object.freeze的使用
https://baijiahao.baidu.com/s?id=1661673186428203221&wfr=spider&for=pc
Object.freeze() 方法可以冻结一个对象,冻结指的是不能向这个对象添加新的属性,不能修改其已有属性的值,不能删除已有属性,以及不能修改该对象已有属性的可枚举性、可配置性、可写性。该方法返回被冻结的对象。
正常的对象操作
 正常对象操作
冻结对象
 冻结对象
冻结对象
冻结数组和冻结对象操作是一样的,就不在描述。
对象的浅冻结
被冻结的对象是不可变的。但也不总是这样。
 浅冻结
浅冻结
这个冻结只是冻结了对象第一层属性,深度属性没办法冻结,还是可以使用。我们要完全冻结这个对象就要深度冻结。
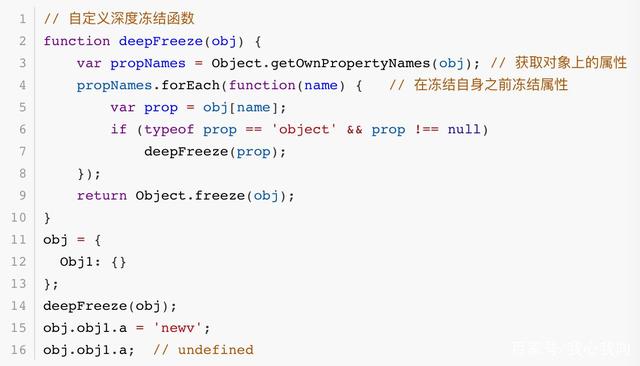 深冻结
深冻结
vue组件v-on=“$listeners“与重写事件,执行两次
https://blog.csdn.net/github_36327470/article/details/118784740
比如 element 组件 el-select,change 事件重写,返回更多的参数:
method: { changeSelect(val) { this.$emit('change', val) } } 1 2 3 4 5 6 7 使用:
解决:去掉 @change=“changeSelect”, 使用 new$listeners 继承原有属性,并覆盖原有事件
———————————————— 版权声明:本文为CSDN博主「萝卜芹菜芽」的原创文章,遵循CC 4.0 BY-SA版权协议,转载请附上原文出处链接及本声明。 原文链接:https://blog.csdn.net/github_36327470/article/details/118784740
Vue JS : How can I access and change Css root variables from vue component to toggle CSS Variables Site Theming?
new Vue({
  el: "#theme",
  data() {
    return {
      dark: false,
      root: null
    };
  },
  mounted: function() {
    this.root = document.documentElement;
  },
  watch: {
    dark: {
      handler: function() {
        // because we are using this handler immideatly we need to wait for data changes using nextTick.
        this.$nextTick(() => {
          if (this.dark) {
            this.root.style.setProperty("--bg", "red");
            this.root.style.setProperty("--text", "black");
            this.root.style.setProperty("--padding", "10px");
            this.root.style.setProperty("--font", "1rem");
          } else {
            this.root.style.setProperty("--bg", "blue");
            this.root.style.setProperty("--text", "green");
            this.root.style.setProperty("--padding", "15px");
            this.root.style.setProperty("--font", "2rem");
          }
        })
      },
      immediate: true

    }
  }
});
:root {
  --bg: white;
  --bg-text: black;
  --padding: 5px;
  --font: 3rem;
}

body {
  background-color: var(--bg);
  color: var(--bg-text)
}

article {
  padding: 50px
}

article h2 {
  margin-top: 100px;
}
<script src="https://cdnjs.cloudflare.com/ajax/libs/vue/2.5.17/vue.js"></script>
<div id="theme">

  <button @click="dark=!dark">dark</button>

  <article>
    <h1>Hello World</h1>
    Lorem ipsum dolor sit amet, consectetuer adipiscing elit. Aenean commodo ligula eget dolor. Aenean massa. Cum sociis natoque penatibus et magnis dis parturient montes, nascetur ridiculus mus. Donec quam felis, ultricies nec, pellentesque eu, pretium quis,
    sem. Nulla consequat massa quis enim. Donec pede justo, fringilla vel, aliquet nec, vulputate eget, arcu. In enim justo, rhoncus ut, imperdiet a, venenatis vitae, justo. Nullam dictum felis eu pede mollis pretium. Integer tincidunt. Cras dapibus.
    Vivamus elementum semper nisi. Aenean v
  </article>

</div>