@(工作笔记)
mysql-record
[TOC]
mysql 忘记了管理员密码解决方法,修改数据库密码的几种方法
https://www.cnblogs.com/selier/p/9519911.html
MySQL允许root远程登录
GRANT ALL PRIVILEGES ON *.* TO 'root'@'%' IDENTIFIED BY 'admin' WITH GRANT OPTION; -- 设置访问权限

FLUSH PRIVILEGES; -- 刷新访问权限表
SELECT User, Password, Host FROM user;
// language=SQL
mac mysql 无法存储中文的问题解决:
方法1:
Connection connection = DriverManager.getConnection("jdbc:mysql:///jdbc?characterEncoding=utf8", "root", "admin");
方法2:
my-default.cnf
mysql --help | grep my.cnf
Default options are read from the following files in the given order: /etc/my.cnf /etc/mysql/my.cnf /usr/local/mysql/etc/my.cnf ~/.my.cnf
mysqld --help --verbose | grep my.cnf
mysqladmin --help | grep -A1 'Default options'
mysqld --help --verbose | grep my.cnf | tr " " "\n"
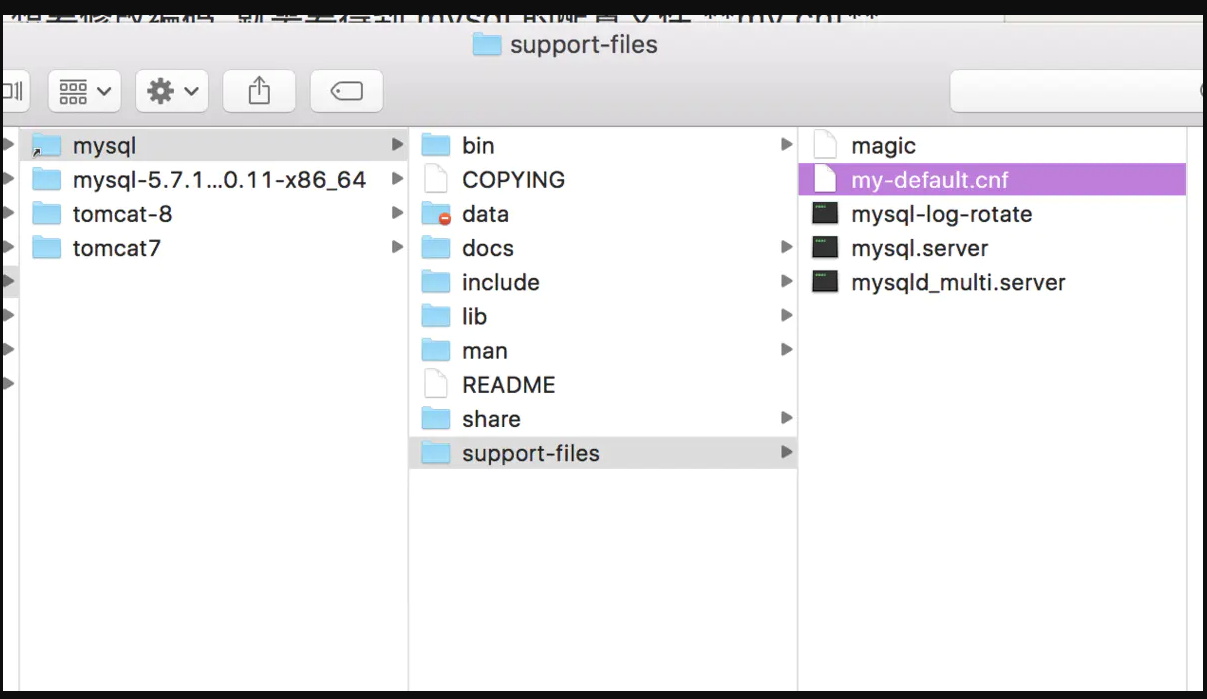
会有my-default.cnf , 没有就蛋疼了
cd /usr/local/mysql/support-files/
查看配置
show variables like ’%char%‘;
Mac环境下的MySQL编码设置
在Mac或Linux上,需要编辑MySQL的配置文件,把数据库默认的编码全部改为UTF-8。MySQL的配置文件默认存放在
/etc/my.cnf或者/etc/mysql/my.cnf:
[client]
default-character-set = utf8

[mysqld]
default-storage-engine = INNODB
character-set-server = utf8
collation-server = utf8_general_ci
这样就完了。。。。。
我当时傻了,这什么玩意儿?!
最后百度,具体操作应该是这样,先找到/etc文件夹下的my.cnf文件(.cnf是后缀名)。如果没有,到/usr/local/mysql/support-files文件夹下找my-default.cnf文件,然后将其复制到/etc下。再分别在my.cnf文件中的[client]和[mysqld]标签下加上
default-character-set = utf8
和
default-storage-engine = INNODB
character-set-server = utf8
collation-server = utf8_general_ci
于是我去找这两个文件,找累死了!终于没找到。
然后百度,发现了这样一段话
官网说:从5.7.18开始不在二进制包中提供my-default.cnf文件。参考:https://dev.mysql.com/doc/refman/5.7/en/binary-installation.html
我的MySQL版本是
Server version: 5.7.21-log MySQL Community Server (GPL)
我去泥煤!!!
后来又百度(万能的百度),没有my.cnf文件自己搞一个。过程如下:
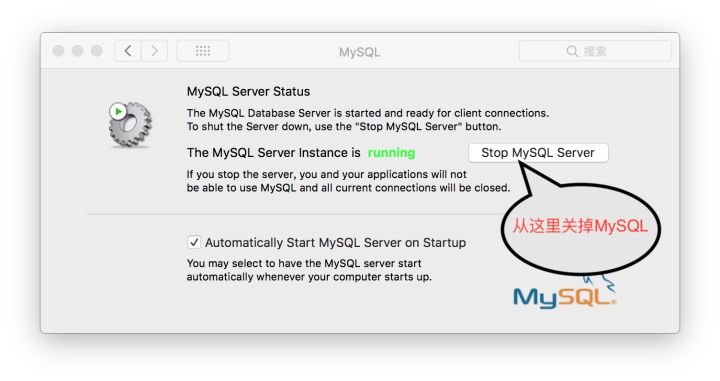
1.先从系统偏好设置里面关掉他妈的MySQL服务!!!
2.打开终端输入以下两行命令
$ cd /etc
$ sudo vim my.cnf
第一行命令不介绍了,第二行命令是创建my.cnf文件
将以下代码在vim编辑器中粘到my.cnf文件里。不会使用vim可以先在B站上学15分钟(vim学习视频)
(以下是要粘贴到my.cnf文件中的代码)
# Example MySQL config file for medium systems.
#
# This is for a system with little memory (32M - 64M) where MySQL plays
# an important part, or systems up to 128M where MySQL is used together with
# other programs (such as a web server)
#
# MySQL programs look for option files in a set of
# locations which depend on the deployment platform.
# You can copy this option file to one of those
# locations. For information about these locations, see:
# http://dev.mysql.com/doc/mysql/en/option-files.html
#
# In this file, you can use all long options that a program supports.
# If you want to know which options a program supports, run the program
# with the "--help" option.
# The following options will be passed to all MySQL clients
[client]
default-character-set=utf8
#password = your_password
port = 3306
socket = /tmp/mysql.sock
# Here follows entries for some specific programs
# The MySQL server
[mysqld]
character-set-server=utf8
init_connect='SET NAMES utf8
port = 3306
socket = /tmp/mysql.sock
skip-external-locking
key_buffer_size = 16M
max_allowed_packet = 1M
table_open_cache = 64
sort_buffer_size = 512K
net_buffer_length = 8K
read_buffer_size = 256K
read_rnd_buffer_size = 512K
myisam_sort_buffer_size = 8M
character-set-server=utf8
init_connect='SET NAMES utf8'
# Don't listen on a TCP/IP port at all. This can be a security enhancement,
# if all processes that need to connect to mysqld run on the same host.
# All interaction with mysqld must be made via Unix sockets or named pipes.
# Note that using this option without enabling named pipes on Windows
# (via the "enable-named-pipe" option) will render mysqld useless!
#
#skip-networking

# Replication Master Server (default)
# binary logging is required for replication
log-bin=mysql-bin

# binary logging format - mixed recommended
binlog_format=mixed

# required unique id between 1 and 2^32 - 1
# defaults to 1 if master-host is not set
# but will not function as a master if omitted
server-id = 1

# Replication Slave (comment out master section to use this)
#
# To configure this host as a replication slave, you can choose between
# two methods :
#
# 1) Use the CHANGE MASTER TO command (fully described in our manual) -
# the syntax is:
#
# CHANGE MASTER TO MASTER_HOST=<host>, MASTER_PORT=<port>,
# MASTER_USER=<user>, MASTER_PASSWORD=<password> ;
#
# where you replace <host>, <user>, <password> by quoted strings and
# <port> by the master's port number (3306 by default).
#
# Example:
#
# CHANGE MASTER TO MASTER_HOST='125.564.12.1', MASTER_PORT=3306,
# MASTER_USER='joe', MASTER_PASSWORD='secret';
#
# OR
#
# 2) Set the variables below. However, in case you choose this method, then
# start replication for the first time (even unsuccessfully, for example
# if you mistyped the password in master-password and the slave fails to
# connect), the slave will create a master.info file, and any later
# change in this file to the variables' values below will be ignored and
# overridden by the content of the master.info file, unless you shutdown
# the slave server, delete master.info and restart the slaver server.
# For that reason, you may want to leave the lines below untouched
# (commented) and instead use CHANGE MASTER TO (see above)
#
# required unique id between 2 and 2^32 - 1
# (and different from the master)
# defaults to 2 if master-host is set
# but will not function as a slave if omitted
#server-id = 2
#
# The replication master for this slave - required
#master-host = <hostname>
#
# The username the slave will use for authentication when connecting
# to the master - required
#master-user = <username>
#
# The password the slave will authenticate with when connecting to
# the master - required
#master-password = <password>
#
# The port the master is listening on.
# optional - defaults to 3306
#master-port = <port>
#
# binary logging - not required for slaves, but recommended
#log-bin=mysql-bin

# Uncomment the following if you are using InnoDB tables
#innodb_data_home_dir = /usr/local/mysql/data
#innodb_data_file_path = ibdata1:10M:autoextend
#innodb_log_group_home_dir = /usr/local/mysql/data
# You can set .._buffer_pool_size up to 50 - 80 %
# of RAM but beware of setting memory usage too high
#innodb_buffer_pool_size = 16M
#innodb_additional_mem_pool_size = 2M
# Set .._log_file_size to 25 % of buffer pool size
#innodb_log_file_size = 5M
#innodb_log_buffer_size = 8M
#innodb_flush_log_at_trx_commit = 1
#innodb_lock_wait_timeout = 50

[mysqldump]
quick
max_allowed_packet = 16M

[mysql]
no-auto-rehash
# Remove the next comment character if you are not familiar with SQL
#safe-updates
default-character-set=utf8

[myisamchk]
key_buffer_size = 20M
sort_buffer_size = 20M
read_buffer = 2M
write_buffer = 2M

[mysqlhotcopy]
interactive-timeout
3.粘完后保存并退出。然后就完事了。
再到打开MySQL,输入
mysql> show variables like '%char%';
结果如下:
+--------------------------+-----------------------------------------------------------+
| Variable_name            | Value                                                     |
+--------------------------+-----------------------------------------------------------+
| character_set_client     | utf8                                                      |
| character_set_connection | utf8                                                      |
| character_set_database   | utf8                                                      |
| character_set_filesystem | binary                                                    |
| character_set_results    | utf8                                                      |
| character_set_server     | utf8                                                      |
| character_set_system     | utf8                                                      |
| character_sets_dir       | /usr/local/mysql-5.7.21-macos10.13-x86_64/share/charsets/ |
+--------------------------+-----------------------------------------------------------+
8 rows in set (0.00 sec)
到此就结束了。
阿里云安装MYSQL步骤
1.安装MySQL官方的yum repository
[root@localhost ~]# wget -i -c http://dev.mysql.com/get/mysql57-community-release-el7-10.noarch.rpm
2.下载rpm包
[root@localhost ~]# yum -y install mysql57-community-release-el7-10.noarch.rpm
3.安装MySQL服务
[root@localhost ~]# yum -y install mysql-community-server 最后会出现个complete!
4.MySQL常用的命令:
重启:systemctl restart mysqld.service 停止:systemctl stop mysqld.service 查看状态:systemctl status mysqld.service
5.登录MySQL
[root@localhost ~]# mysql -u root -p 意思就是用root用户登录,然后准备输入密码。 第一次启动MySQL后,就会有临时密码,这个默认的初始密码在/var/log/mysqld.log文件中,我们可以用这个命令来查看: grep "password" /var/log/mysqld.log

1095436-20180829201709126-633738222.png
6.然后可以先跳过密码验证登录进MySQL
- 停止服务:
systemctl stop mysqld.service
- 修改mMySQL的配置文件:
vi /etc/my.cnf
- 在最后加上配置:
skip-grant-tables
- 然后再启动服务:
systemctl start mysqld.service
- 然后这时就可以跳过密码来登录mysql
mysql -u root
- 然后是修改下密码
mysql> use mysql; Database changed mysql> update mysql.user set authentication_string=password('4008') where user='root' ; Query OK, 1 row affected, 1 warning (0.00 sec) Rows matched: 1 Changed: 1 Warnings: 1
最后exit退出mysql,重新在刚刚那个配置文件中去掉skip-grant-tables,然后重启MySQL。 7.遇见的问题

image.png
明明已经重置了密码却还不行
百度上说的大致是密码等级太简单,如果你坚持要这样的密码,要改变密码等级: mysql> set global validate_password_policy=0; //改变密码等级 mysql> set global validate_password_length=4; //改变密码最小长度 SET PASSWORD = PASSWORD('密码'); // 然后再输入刚刚的命令

image.png
然后再用 show databases;能正常访问了,但是使用Navicat工具登录还是报错了
1130 - Host '115.196.250.99' is not allowed to connect to this MySQL server
这里参考了 MySQL5.7初始化后5种密码重置方法中的方法3:使用update方式
mysql> UPDATE mysql.user SET authentication_string = PASSWORD('Marry583@&%!'), password_expired = 'N' WHERE User = 'root' AND Host = 'localhost'; Query OK, 1 row affected, 1 warning (0.00 sec) mysql> flush privileges; // 这一步不能忘了,不然不会生效 Query OK, 0 rows affected (0.00 sec) 然后重新连接就成功了
image.png

1、参考 下载安装 https://www.cnblogs.com/wangshen31/p/9556804.html 2、修改权限表 https://blog.csdn.net/zd147896325/article/details/82427107
登录mysql mysql -u root -p
重启服务:systemctl start mysqld.service 停止服务:systemctl stop mysqld.service
修改密码(https://www.cnblogs.com/reid21/p/9314376.html )
mysql> ALTER USER 'root'@'localhost' IDENTIFIED BY 'Tom579#$%^&';
ERROR 1290 (HY000): Unknown error 1290
mysql> flush privileges;
Query OK, 0 rows affected (0.00 sec)
#!/usr/bin/env bash

#linux彻底干干净净完全卸载 mysql
#https://blog.csdn.net/private66/article/details/80624212

# 注意:可能会抛依赖错误错 error:Failed dependencies:
#
# ,则加上 --nodeps不检查依赖关系删除,命令如下
#
# rpm -e --nodeps mysql-libs-5.1.73-8.el6_8.x86_64

systemctl disable mysqld > /dev/null 2>&1
systemctl stop mysqld > /dev/null 2>&1

for item in `rpm -qa | grep -i mysql`; do
    rpm -ev --nodeps "${item}"
done
#
##1、先把postfix 和mariadb-libs卸载掉,不然的会有依赖包冲突:
rpm -e postfix mariadb-libs > /dev/null 2>&1
#
## 2、安装mysql的依赖net-tools和 perl
yum -y install net-tools perl
#
## 3、安装mysql-common包:
rpm -ivh mysql-community-common-5.7.22-1.el7.x86_64.rpm
#
## 4、安装mysql-libs包:
rpm -ivh mysql-community-libs-5.7.22-1.el7.x86_64.rpm
#
## 5、安装mysql-client包;
rpm -ivh mysql-community-client-5.7.22-1.el7.x86_64.rpm
#
## 6、安装mysql-server包
rpm -ivh mysql-community-server-5.7.22-1.el7.x86_64.rpm

## 简单密码使用
sed -i 's/\[mysqld\]/[mysqld]\nvalidate_password=off/g' /etc/my.cnf

## 7、设置开机启动:
systemctl enable mysqld
#
## 8、启动MySql服务
systemctl start mysqld

#grep 'temporary password' /var/log/mysqld.log
content=`awk '/temporary password/ {print $NF}' /var/log/mysqld.log`
echo -e "\033[0;33;1m临时生成的登陆密码[$content]\033[0m"

cmd='mysql -u root -p'
echo -e "\033[0;38;1m${cmd}\033[0m"
echo -e "\033[0;32;1m输入${content}\033[0m"

content="mysql> ALTER USER 'root'@'localhost' IDENTIFIED BY 'admin';"
echo -e "\033[0;38;1m${content}\033[0m"

content="mysql> GRANT ALL PRIVILEGES ON *.* TO 'root'@'%' IDENTIFIED BY 'admin'  WITH GRANT OPTION;
mysql> FLUSH PRIVILEGES;"
echo -e "\033[0;38;1m${content}\033[0m"

content="如果出现乱码:在链接地址栏后添加useUnicode=true&characterEncoding=utf-8"
echo -e "\033[0;38;1m${content}\033[0m"


#rpm -e --nodeps mysql-community-client-5.7.22-1.el7.x86_64
#rpm -e --nodeps mysql-community-libs-5.7.22-1.el7.x86_64
#rpm -e --nodeps mysql-community-server-5.7.22-1.el7.x86_64
#rpm -e --nodeps mysql-community-common-5.7.22-1.el7.x86_64

# 如果报错 find / -name "*mysql" # 找到的都删掉

# 解决MySQL8.0报错:Unknown system variable 'validate_password_policy'
https://blog.csdn.net/qq_34545939/article/details/83623606

MySQL 5.7 进行如下设置,即可解决问题:

mysql>  set global validate_password_policy=0;
mysql> set global validate_password_length=1;